A little rewriting and a lot more links help flesh out this helpful “Introduction to Beading” post–it’s a longer read, but great if you’re a newbie at creating your own beaded jewelry!
Tag Archives: crafts
5 Lovely (and Simple!) Beaded Ring Tutorials

Handcrafting beaded bracelets and necklaces is more well-known now, thanks to Pinterest (and the Internet in general)–but the craft of beaded rings is just now beginning to appear more often on craft blogs and pinners’ boards.
What I love about these rings is that even though they’re made with beads and wire, they still look delicate and pretty, just like I like my jewelry to be. (The last one, the wire rosette, doesn’t have beads but is actually my favorite!) Read through, grab your ring sizer and ring mandrel, plus some beads and wire, and pick your favorite to try!
Tutorial from RubysBeadwork.com
This tutorial involves bead sewing and a little bit of knowledge of various stitch types, but it’s still pretty simple, and it makes a great, vintage-looking piece!

I love how classy the single bead looks when wrapped around with silvery threadlike wire. Who would ever believe this could be so simple?

Tutorial from The Cheese Thief
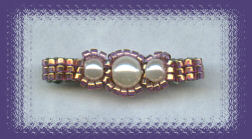
The delicate clusters of white pearlescent beads in this “8-petal flower” ring have gotten away with me. Be still my beading heart. 🙂

This tutorial makes a fully-beaded ring (band and all)–easily customizable with different colors of stones, though this blue/white/silver combination is already lovely.
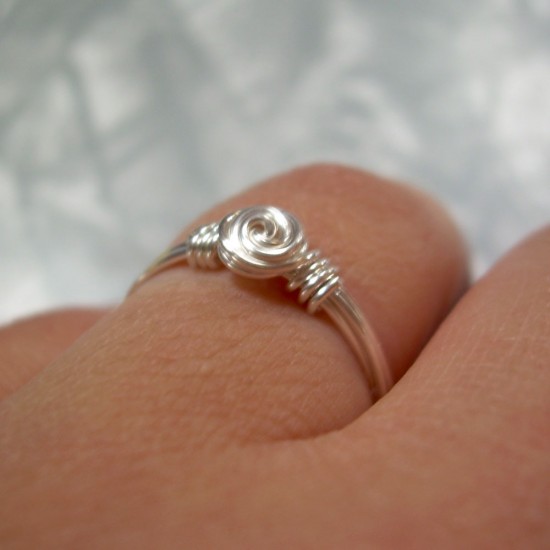
Tutorial from McFarland Designs
Ooooo SHINY! Even though this one doesn’t technically have beads on it, it does still require beading techniques to make. Swirls of shining wire wrapped around each other form a tiny rosette (which I’m tempted to make and use as a handmade engagement ring!).
What Do You Think?
Which is your favorite? How would you customize one of these designs for your own? Tell me in the comments!
Glasses Off: 4 Inspiringly Creative Sites
Sometimes, when it feels like I’ve squeezed all the creativity out of my neurons, I feel at a loss…and then I remember that the Internet is a wondrous place full of other awesome people being creative and posting about it. Once I read about their projects, I find my creative juices replenishing themselves like mad! Here are four sites you’ll want to visit if you’re feeling creatively drained:
Instructables
A classic site for learning how to make things…read through some of these articles and get inspired!
Sortrature.com
From crafts to fashion, wedding ideas to travel, this site has a little bit of everything to delight your sense of creativity.
Demilked.com
All sorts of articles and photos, concerning photography ideas, architecture, and even web design, among others!
FindInspirations.com
A visual catalog of all sorts of design ideas and articles, arranged in a Pinterest-like flow down the page.
Beginner Beading, part 2: Choosing Good-Quality Beads
When you’re just beginning to bead, as I wrote about last week, it’s hard to know what kinds of beads to choose–there are literally hundreds of different kinds available! And, as I unfortunately learned, not all beads are created equal in quality.
A Cautionary Tale: The Missing Bead

|
When I first started beading, I made this necklace, pictured at left, as one of my first projects. I was very, very proud of my work, especially since most of the beads hadn’t cost that much to purchase and yet rendered such a lovely result, interspersing black plastic teardrop beads with dark blue and clear sparkling crystal beads. |

|
What I didn’t know, however, was that one of the plastic beads already had a crack in it, right near the point where the beading wire threaded through it–and one day, it cracked off while I was wearing the necklace. I didn’t notice until I got home, took the necklace off, and realized that the beaded pattern at the two ends of the necklace no longer matched (denoted by the red circles on the image at left). |
Learn From My Fail: Choose Better Beads
In order to keep from losing bits off your own beading projects, here’s some tips on which beads to choose (and which to avoid):
|
Quality Beads…
|
Cheap Beads…
|
Final Word to the Wise: Shop Local Bead Stores
The best places I have found for quality beads are small, local bead and craft shops, whether you buy in-store or online. Such places often simply take care of their bead stock better, storing and displaying them on flocked jewelry trays which don’t allow the beads to get crushed or knocked off easily. Plus, bead specialty stores often carry the crystal-like beads and other finer-quality stock that will give your beading projects not only a more expensive look, but a longer life. (Lastly, the shop owners can help you select just the right bead for a project!)
The Creatively DIY-ed Life
For this week’s creativity post, I thought I’d showcase a selection of DIY projects. After all, there’s a lot of creative license–and a lot of fun!–in making useful items for your home and life. From little decorative items to organizational tools, from wall art to pieces of furniture, there’s literally nothing you can’t DIY…as the following slew of pictured tutorials show! (See the link below each picture for the tutorial!)


For More Ideas
ApartmentTherapy.com’s DIY Showcase
31 Insanely Easy and Clever DIY Projects @ Buzzfeed.com
Best DIY Projects Ever @ CasaSugar.com
Weekend Home Projects @ BHG
DIY Projects Around the House (Pinterest board)
LifeHackers’ Top 10 DIY Home Projects
TLC’s DIY Projects and Advice
DIY Home Projects (Pinterest board)
CountryLiving’s Weekend Home Decor Projects
The Daily Green’s Best DIY Projects
The Internet: A Creative Crafter’s Paradise
Are you a crafter and feeling lonely or uninspired in your work? Wish you had someone to ask about how to accomplish certain pieces, how to think outside your own little box?
In that case, the Internet is your best friend. Today, I’ll showcase the websites I’ve found in my search for informative and helpful crafting sites for any and all sorts of crafters out there.
Skip to: For All Crafters | Specific Craft Sites | Buy and Sell Crafts | Craft Site Directories
SassySteals
Etsy
ArtGirlPottery
HemmaDesign
Brothers-Handmade.com
HandmadeFuture.com
Save-On-Crafts.com
StampingFools.com
CraftSiteDirectory.com
OnlineCraftSites.com
AllCraftSites.com
CraftyTips.com
Bead Textures: Sparkly, Pearly, or Metallic
What is “bead texture,” you might ask? Bead texture (not just how the bead feels, but how it reflects light) makes a distinct visual difference–a sparkly blue bead will catch more light and be less subtle than a pearly blue bead will, etc.
Today, I thought I’d feature a few examples of favorite bead textures I like to use in my jewelry projects, so I can draw the eye better to my necklaces’ focal points, and create lovely earrings that complement rather than detract.
Sparkly Beads: For Centerpieces and Catching the Light
 Swarovski Victory Pendant |
 Swarovski Teardrop |
 Fire-Polished Beads |
Metallic Beads: For Secondary Designs and Setting Off Focal Points
 Shamballa beads |
 Casbah beads |
 Hematite Ovals |
Pearly Beads: For “Background” Colors and Soft, Subtle Enhancement
 Silver-Blue Glass Pearls |
 Pressed-Glass Beads |
 Mother-of-Pearl Melon Strand |
What to Do With These Beads?
In my designs, I like to mix and match sparkly textures with pearly or metallic, to naturally draw the eye to certain parts of the necklace or earring and let the other patterns recede into the background.
The sparkliest and most eye-catching beads are generally the ones I reserve for the main focal point of the necklace, though sometimes I’ll “hide” a tiny sparkly bead in between a couple of equally-tiny metallic or pearl beads, just for a little extra interest.
Metallic beads, I find, are great for spacing apart pearl or sparkly beads–they are the “in-between” texture, since they can function as light-catching, but they can be less so if they are darker in color. Thus, they work great in just about any kind of project, no matter the length or complexity. You just need to make sure the color of the metal complements the other beads you’re using!
Though sometimes I’ll use a whole necklace of pearl beads, I generally like to intersperse them with metallic or sparkly beads, since their more subtle shimmer pairs well with the shinier textures. It seems they help set off the colors in the sparkly beads, especially if they are in the same color family.
Patterns and Project Ideas
Now that you’ve got ideas for using different beading textures together, here’s a few links to get you started on various beading projects and patterns. Happy beading! 🙂
Off the Beaded Path Project Ideas and Patterns
FaveCrafts.com Beading Patterns
KandiPatterns.com Bead Design Tool
CraftBits.com Bead Craft Ideas
OrientalTrading.com Beading Projects
Useful Cardstock Crafts
Cardstock isn’t just for decorative little trinkets that are easily crushed anymore. In fact, there are lots of cardstock crafts that actually provide a useful function.
I didn’t believe it for myself, however, until I started investigating. As a sometime crafter, I want crafts that are pretty but useful, because I already have a houseful of useless clutter. (Pack rat? Moi? 😛 )
Thus, when I ran across the following tutorials on cardstock crafting, which resulted in homemade items one could actually use and enjoy, I was pleasantly surprised, and I wanted to share these with you.
Around-The-House Objects
Drink Coasters
Not only can you use printed cardstock to decorate plain square tiles as coasters, but you can make coasters out of cardstock itself! (The just-cardstock coasters are a little flimsy, so perhaps you could make them a little more permanent by building up layers of cardstock together, or attaching the cardstock to a base of cork.)
 StyleMePretty: Tile Coaster Tut |
 CreativeConceptsNYC: Cardstock Coaster Tut |
Decorative (Yet Functional) Boxes
Literally tons of “cardstock box” tutorials are out there, so I selected three of the most unique and cute tuts I found. Who knew there were so many uses for random paper scraps and gift cards? You can make boxes to hold small items, as well as small gift boxes, and even a cute storage box for your favorite packets of tea!
|
No Image Only Video Etsy: Cardstock-Scrap Box Tut (video) |
 Craftypod: Old-Giftcard Box Tut |
 MelStampz: Teapot Box Tut |
|
 CreativityPrompt: Box of Drawers Tut |
|
Other Useful Items
Besides coasters and boxes, you can also make big envelopes, and seed packets for storing seeds or giving them as gifts.
 Alenka’s Printables: Seed Packet Tut |
No Image Only Template About.com: 4.5″ x 6″ Blank Envelope Template |
Special Event Supplies
If you don’t want to spend a lot of money on party supplies, especially for paper products, cardstock seems to be the way to go. These creative ideas for napkin rings, party hats, wedding favor bags, and wedding program fans are simple to make and money-saving as well!
|
No Image Only Template About.com: Blank Wedding Favor Bag Template |
No Image Only Template About.com: Napkin Ring Template |
No Image Only Template About.com: Party Hat Template |
 About.com: Wedding Program Fan Tut |
Just For Fun
Sounds strange to be able to make toys and fun things out of cardstock, but you can! The following three tutorials show you how to make models, alphabet blocks, and even 3D glasses out of cardstock. (The cardstock modeling FAQ, in particular, shows you how to make models of buildings, planes, etc. out of cardstock for kids to decorate and play with…or for you to decorate and play with!)
|
No Image Only Instructions CardFAQ: Cardstock Modeling |
 About.com: 3D Glasses Tut |
No Image Only Instructions/Template About.com: Alphabet Blocks Tut |
And Last but Not Least…
Not only can you use cardstock for its own crafts, but you can use cardstock to aid you in other craft-making, like creating templates for tracing and stenciling.
 CraftIdeas.info: Cardstock Templates |
Summary
Cardstock has so many useful applications around your home, and for all sorts of special events. If you’ve never tried crafting with cardstock, try some of the templates and tutorials I’ve linked to–you may just surprise yourself!
Papercrafting Post #2: Ornare

Though the word “ornare” may look exotic and strange, it’s actually the word for piercing paper to “draw” cool patterns and designs.
I never knew this crafting art existed until I was researching my first papercrafting post and happened across supplies for “ornare” among the listings at various papercraft websites. “What in the world is ornare?” I wondered. Then I clicked and found out!
Ornare the Professional (More Expensive) Way
You can buy actual ornare kits, complete with special foam board, all kinds of pretty paper, and special needles to poke the holes with. Along with Creative Papercrafts’ page, I discovered a couple of other interesting sites where you can pick up ornare supplies, like pattern templates, piercing pads (to protect the surface underneath your pierced paper as well as to give you a cleaner punch), needle tools, etc. They appear listed below:
Kamya.com Ornare Templates
EcstasyCrafts’ Ornare Section
TerryficTimes.com Ornare Introduction
PaperWishes.com Ornare Template
Ornare the Cheap Way
However, while looking at all of this, a thought kept popping to mind: “Why couldn’t I just do this with regular printer paper of any color, a few pieces of foam core or flat styrofoam, and a regular sewing needle?”
So, here’s what I brainstormed (and my theory is backed up by this post over at Gem’s Cottage):
- Find an outline of a picture you like (nothing too detailed or you’ll go crazy trying to copy it).
- Lightly draw your chosen pattern on your printer paper with pencil. Make sure the outline can erase neatly!
- Lay your paper pattern on top of some foam core or flat styrofoam. Likely you will need to affix it using either some sort of clip, or even a piece of easily-removable tape or pins.
- With your needle, begin to punch holes at small regular intervals along the lines of your pattern–almost like Connect the Dots in reverse!
- Once you’re finished piercing the pattern out, erase all the light pencil marks.
- Now, you can leave the paper as is, cut out your pattern and layer a contrasting color of paper underneath it, or whatever your crafting heart desires!
With these kinds of instructions, ornare is an approachable and easy art form for making delicate and beautiful paper art!
To Learn More
The Search Press Book of Traditional Papercrafts offers even more insight on how to start doing crafts featuring ornare. Try it and let your imagination pierce through the paper!
Getting All Beaded Up

It was a random side trip to Walmart that started it. I found myself in the Fabric and Crafts section, staring down a glittering aisle I’d not bothered to travel before–the bead section. Literally hundreds of cards full of beads hung on the racks, in varying shades and amounts of sparkle and glimmer. How had I never seen this aisle before?
Pretty much out of the blue, I picked up a few cardfuls of beads that interested me, plus a couple of “Instant Necklace” kits, with the appropriate silver clasps already attached to the wire and cut to size. Two necklaces later, I was absolutely hooked on creating my own beaded jewelry.
The following pictures are of necklaces I created using the Instant Necklace wire kits plus my own selection of beads, arranged in self-created patterns. The Instant Necklace kits are cut to size, but some of the beading patterns did not take up all the room on the necklace (mainly because I needed room to handle the wire long enough to thread it through the other side of the clasp). Thus, they might be a little bare in spots, but they wear well once they are on.
Samples of My Work

This was my first necklace, but certainly not my last. I loved alternating the silver and dark blue, denim-patterned beads, and this is still one of my go-to necklaces when wearing blue, black, or white tops, though it can also go with gray and even red on occasion.

This is one of my favorite necklaces I’ve ever done, because it is BLUE and SPARKLY. 😀 It makes me happy. Not to mention that I enjoy the play between pearls and gemstones, managing to create a weightless look without too much effort. Since I wear a lot of teal and white, this necklace sees a lot of wear especially in the summer. (This necklace’s wire was accidentally bent in two places during an aggressive airport baggage check, which accounts for the odd angles in the picture, but it straightens out well when I wear it.)

Even though this one was a bit of a color stretch for me, I’ve found myself wearing it more often than I thought I would. I have some purple tops that go well with it, but it has surprised me how well it wears with other colors–even pink shirts look good with this!
My Personal Beading Style
The trend in beading today may be big, chunky, earth-based necklaces, but I prefer my beaded jewelry to actually look, well, like jewelry: polished, pretty little stones, delicately set together. Thus, I choose small beads over large, and I like to combine sparkly beads with pearlescent ones on the same necklace for pretty variations.
Most of how I put necklaces together is rather instinctive; I look at a selection of beads in a store and think, “Ooh, I have some pearls that will go well with that.” A few minutes of arranging the beads back at home generally brings me to a setup I like, and I run with it.
Along with my idea of pairing a sparkling translucent bead with a pearlescent bead of same or similar color, I also like to vary sizes along the length of the piece I’m making–usually, the beads in the middle of the necklace will be slightly larger than the ones at each end, and that’s deliberate (called “graduating sizes”). If I do change it up and mix in bigger beads earlier in the pattern, I will generally set smaller, clear beads around each large stone to help it not stand out quite so much.
Lastly, I try to use symmetrical patterns for my necklaces. If I have a pattern started on the left side of the necklace that goes “tiny pearl, tiny gem, small pearl, big gem, small pearl, tiny gem, tiny pearl,” then I mimic that when I get to the right side of the necklace in the same place.
It can be hard to keep up with where you are in the necklace, so I recommend laying out your beads first on a beading tray to get your pattern together. Amazon.com has several beading trays (also called “beading boards”) that help corral your beads and even align them into a necklace-like shape so that you can make your patterns and thread the wire through more easily.
I’m certainly not the most skilled beader out there–I’m still not familiar with all the intricate patterns you can use to make bracelets and necklaces out of, like macrame. However, the single-strand necklaces I make are enough for my jewelry needs, and they are simple enough to master even for my clumsy fingers.
Try Beading For Yourself
For those who are veterans in beading, or those who are completely new to the craft, many big-box stores like Walmart have cheap beads that don’t look completely tacky. Choosing solid colors of beads generally gives you a better product–some of the mixed-color beads end up being ill-made, as I’ve unfortunately found out. There are also a lot of online tutorials and articles which can help you out!
You can also find quite a bit of beads and beading supplies online, or go to an actual beading specialty store–I’m lucky enough to have a beading specialty store in my area, called Off The Beaded Path. Beading specialty stores will likely have beads of better quality, but you will often pay a little more for that quality (which is okay).
In terms of metallic beading wire, necklace clasps, earring pins, etc. (collectively known as “findings”), you’re better off going to a specialty store or looking online. Walmart had those Instant Necklace kits that got me started, which were great for me because I didn’t have to fool with putting the clasps on the wire myself. But if you want to build the necklace completely from scratch, you will find more variations in color and style going to a specialty store.
I tend to blend my big-box-store finds with my specialty-store finds to make pieces that are at once fairly inexpensive to make and expensive-looking. Try combinations of your favorite colors and favorite textures of beads, and experiment as much as you can!
Beading Links
Beadage.net – projects, instructions, beads available online
BeadingDaily.com – daily ideas, tutorials, and patterns
BeadingTimes.com – every month, a new issue, with articles about how to market your jewelry, how to come up with original designs, and lots of other topics!
Free Patterns @ Beadwork.About.com – free beading patterns
TheBeadCoop.com – patterns to download and print