There are a LOT of beading tutorials out there for us beginners…but many of those tutorials expect you to already know quite a bit about the terminology and tools of beading, as I discovered when I began doing some research for this post. If you’re truly a beginner, this can be VERY confusing!
So, for this article, I wanted to help introduce beginning beaders to the lingo and the important tools for making beaded jewelry, as well as giving some bead storage tips and showcasing a couple of basic video tutorials. Let’s begin!
A Few Terminology Tips
 Image source |
At left, this is a jump ring, used for connecting clasps to jewelry as well as other more complex beading tasks. These can be pried apart and squished back together pretty easily with the right beading tools. |
 Image source |
Jump rings and necklace clasps (like the ones at left) are two types of jewelry findings. Findings are generally the metal or plastic bits that are the foundations of any beading project. (Other examples of findings are headpins for making drop earrings, crimp beads for stopping a bead string from moving around on the wire, spacers for keeping beads a certain distance apart, etc.)
See more examples of findings at the following websites: |
Beading Tools
Every beader needs the following tools for even the most basic of beading crafts:
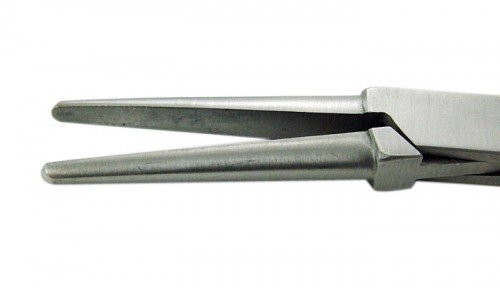
Image source
These kind of pliers, often called “needlenose” or “round-nose” pliers, help you hold delicate projects without squishing them, and also help you twist beading wire for various looks.
 Image source |
Additionally, you’ll need these kind of pliers, called “flat-nose pliers,” for squishing jump rings back together, affixing clasps, and all sorts of things. |
 Image source |
These are called “crimping pliers” (or are just referred to as a “crimping tool”); these can help you hold slippery projects (with the spot marked “F”), and they can also mash down things like crimp beads in the spot marked “E”. |
 Image source |
And lastly, this little tool, called a wire cutter, is immensely helpful when you have excess beading wire at the end of a project! |
Bead Storage

Image source
You can go and buy storage cases specifically designed for beads if you’ve got a craft supply store in your area. BUT, if you don’t, you can also use fishing tackle boxes (get the clear ones with small compartments) or weekly pill boxes. (Also, you can get creative and repurpose some little containers you have lying around the house, such as baby food jars or empty spice containers. Just make sure the lids of your containers close tightly!)
Video Tutorials: Attaching Clasps and Ending Necklaces
How to Attach a Lobster Claw
How to End a Necklace
Further Reading: Beginner Beading Tutorials
Choosing the Right Size Beading Wire
Beadaholique: YouTube Playlist of Beading Tutorials
Making-Beaded-Jewelry.com
One thought on “Beginner Beading: Getting Into the Game”