More links to other beading articles I’ve written, plus tightened-up writing overall, has made this post worth reading again! Click to read more about how I design my beaded jewelry!
Tag Archives: beading
Redo: Getting All Beaded Up
A little rewriting and a lot more links help flesh out this helpful “Introduction to Beading” post–it’s a longer read, but great if you’re a newbie at creating your own beaded jewelry!
5 Lovely (and Simple!) Beaded Ring Tutorials

Handcrafting beaded bracelets and necklaces is more well-known now, thanks to Pinterest (and the Internet in general)–but the craft of beaded rings is just now beginning to appear more often on craft blogs and pinners’ boards.
What I love about these rings is that even though they’re made with beads and wire, they still look delicate and pretty, just like I like my jewelry to be. (The last one, the wire rosette, doesn’t have beads but is actually my favorite!) Read through, grab your ring sizer and ring mandrel, plus some beads and wire, and pick your favorite to try!
Tutorial from RubysBeadwork.com
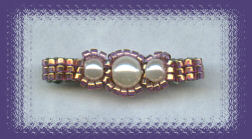
This tutorial involves bead sewing and a little bit of knowledge of various stitch types, but it’s still pretty simple, and it makes a great, vintage-looking piece!

I love how classy the single bead looks when wrapped around with silvery threadlike wire. Who would ever believe this could be so simple?

Tutorial from The Cheese Thief
The delicate clusters of white pearlescent beads in this “8-petal flower” ring have gotten away with me. Be still my beading heart. 🙂

This tutorial makes a fully-beaded ring (band and all)–easily customizable with different colors of stones, though this blue/white/silver combination is already lovely.
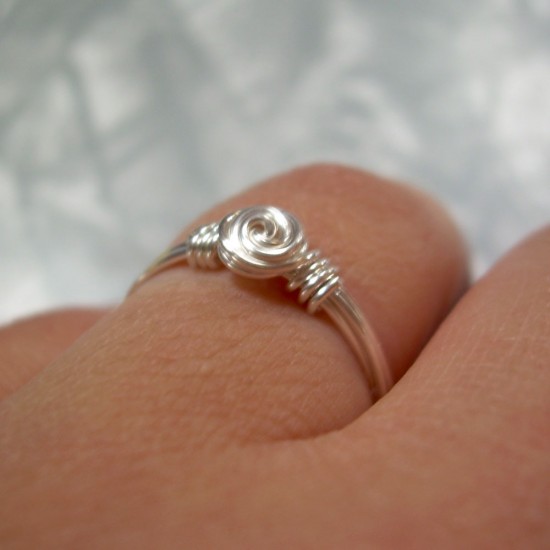
Tutorial from McFarland Designs
Ooooo SHINY! Even though this one doesn’t technically have beads on it, it does still require beading techniques to make. Swirls of shining wire wrapped around each other form a tiny rosette (which I’m tempted to make and use as a handmade engagement ring!).
What Do You Think?
Which is your favorite? How would you customize one of these designs for your own? Tell me in the comments!
Beginner Beading, part 3: Pretty Patterns
Making beaded jewelry is not just about selecting good beads or perfecting your techniques–it’s ultimately about making beautiful jewelry with lovely beaded patterns.
I don’t claim to be a perfect designer by any means, but I know what kinds of patterns I like to see in jewelry, and that’s how I design my own beaded necklaces thus far. Here are some examples:

This necklace (which is the slightly-messed-up one from last week) displays a couple of pretty design tactics:
- Symmetrical patterns–the necklace can be flipped left to right with no change
- Colorful beads interspersed with neutral beads (in this case, silver) to help set the colors off
- 3 sparkly beads used at the center of the necklace (bottom center of pic) to draw the light and the viewer’s eye

A little different strategy was employed with this necklace, my first take on using white pearls in a design:
- Vary the sizes and shapes of beads used in a pattern for visual interest in a mono-colored necklace
- Use tiny beads to separate larger beads and make them look like they’re floating
- Let one unusual bead be the center of a symmetrical 5- or 7-bead pattern (you see this twice in the above pic)–surround the unusual bead with more normal beads to let it take the spotlight

- Juxtaposing different finishes of beads in the same color family (here, using lavender) can add a soft effect to your patterns.
- Creating a focal point in the center of your necklace can be just as easy as grouping 3 larger, lighter-finish beads and then surrounding them with smaller, darker-finish beads.
- Patterned or textured beads can add subtle flair when placed alongside smoother beads.
- Don’t be afraid to use oblong and round beads together–oblong beads, especially in clear or neutral colors, can be used as visual “spacers” to make your colorful beads pop more.

(Not sure why this necklace’s beads showed up so green–they’re actually Pacific opal beads, which are blue-green. Oh well!)
- Use smaller beads out at the ends of your beading project, and larger beads toward the middle–that creates a “graduated” effect which looks more graceful.
- Alternate opaque and translucent/sparkly beads for a playful pattern.
Summary
Working with symmetry, different bead textures and shapes, and colors which play well off each other can make any beaded jewelry project lovely. Try it out–just lay a few beads together on a table and rearrange them to your heart’s content. You just might come up with a randomly gorgeous pattern!
Beginner Beading, part 2: Choosing Good-Quality Beads
When you’re just beginning to bead, as I wrote about last week, it’s hard to know what kinds of beads to choose–there are literally hundreds of different kinds available! And, as I unfortunately learned, not all beads are created equal in quality.
A Cautionary Tale: The Missing Bead

|
When I first started beading, I made this necklace, pictured at left, as one of my first projects. I was very, very proud of my work, especially since most of the beads hadn’t cost that much to purchase and yet rendered such a lovely result, interspersing black plastic teardrop beads with dark blue and clear sparkling crystal beads. |

|
What I didn’t know, however, was that one of the plastic beads already had a crack in it, right near the point where the beading wire threaded through it–and one day, it cracked off while I was wearing the necklace. I didn’t notice until I got home, took the necklace off, and realized that the beaded pattern at the two ends of the necklace no longer matched (denoted by the red circles on the image at left). |
Learn From My Fail: Choose Better Beads
In order to keep from losing bits off your own beading projects, here’s some tips on which beads to choose (and which to avoid):
|
Quality Beads…
|
Cheap Beads…
|
Final Word to the Wise: Shop Local Bead Stores
The best places I have found for quality beads are small, local bead and craft shops, whether you buy in-store or online. Such places often simply take care of their bead stock better, storing and displaying them on flocked jewelry trays which don’t allow the beads to get crushed or knocked off easily. Plus, bead specialty stores often carry the crystal-like beads and other finer-quality stock that will give your beading projects not only a more expensive look, but a longer life. (Lastly, the shop owners can help you select just the right bead for a project!)
Beginner Beading: Getting Into the Game
There are a LOT of beading tutorials out there for us beginners…but many of those tutorials expect you to already know quite a bit about the terminology and tools of beading, as I discovered when I began doing some research for this post. If you’re truly a beginner, this can be VERY confusing!
So, for this article, I wanted to help introduce beginning beaders to the lingo and the important tools for making beaded jewelry, as well as giving some bead storage tips and showcasing a couple of basic video tutorials. Let’s begin!
A Few Terminology Tips
 Image source |
At left, this is a jump ring, used for connecting clasps to jewelry as well as other more complex beading tasks. These can be pried apart and squished back together pretty easily with the right beading tools. |
 Image source |
Jump rings and necklace clasps (like the ones at left) are two types of jewelry findings. Findings are generally the metal or plastic bits that are the foundations of any beading project. (Other examples of findings are headpins for making drop earrings, crimp beads for stopping a bead string from moving around on the wire, spacers for keeping beads a certain distance apart, etc.)
See more examples of findings at the following websites: |
Beading Tools
Every beader needs the following tools for even the most basic of beading crafts:
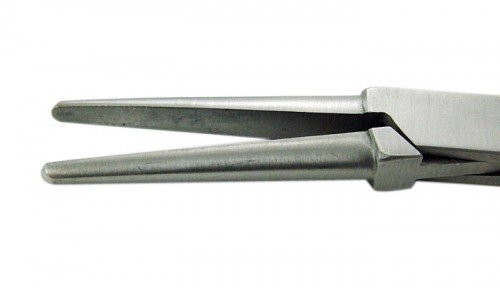
Image source
These kind of pliers, often called “needlenose” or “round-nose” pliers, help you hold delicate projects without squishing them, and also help you twist beading wire for various looks.
 Image source |
Additionally, you’ll need these kind of pliers, called “flat-nose pliers,” for squishing jump rings back together, affixing clasps, and all sorts of things. |
 Image source |
These are called “crimping pliers” (or are just referred to as a “crimping tool”); these can help you hold slippery projects (with the spot marked “F”), and they can also mash down things like crimp beads in the spot marked “E”. |
 Image source |
And lastly, this little tool, called a wire cutter, is immensely helpful when you have excess beading wire at the end of a project! |
Bead Storage

Image source
You can go and buy storage cases specifically designed for beads if you’ve got a craft supply store in your area. BUT, if you don’t, you can also use fishing tackle boxes (get the clear ones with small compartments) or weekly pill boxes. (Also, you can get creative and repurpose some little containers you have lying around the house, such as baby food jars or empty spice containers. Just make sure the lids of your containers close tightly!)
Video Tutorials: Attaching Clasps and Ending Necklaces
How to Attach a Lobster Claw
How to End a Necklace
Further Reading: Beginner Beading Tutorials
Choosing the Right Size Beading Wire
Beadaholique: YouTube Playlist of Beading Tutorials
Making-Beaded-Jewelry.com
Bead Textures: Sparkly, Pearly, or Metallic
What is “bead texture,” you might ask? Bead texture (not just how the bead feels, but how it reflects light) makes a distinct visual difference–a sparkly blue bead will catch more light and be less subtle than a pearly blue bead will, etc.
Today, I thought I’d feature a few examples of favorite bead textures I like to use in my jewelry projects, so I can draw the eye better to my necklaces’ focal points, and create lovely earrings that complement rather than detract.
Sparkly Beads: For Centerpieces and Catching the Light
 Swarovski Victory Pendant |
 Swarovski Teardrop |
 Fire-Polished Beads |
Metallic Beads: For Secondary Designs and Setting Off Focal Points
 Shamballa beads |
 Casbah beads |
 Hematite Ovals |
Pearly Beads: For “Background” Colors and Soft, Subtle Enhancement
 Silver-Blue Glass Pearls |
 Pressed-Glass Beads |
 Mother-of-Pearl Melon Strand |
What to Do With These Beads?
In my designs, I like to mix and match sparkly textures with pearly or metallic, to naturally draw the eye to certain parts of the necklace or earring and let the other patterns recede into the background.
The sparkliest and most eye-catching beads are generally the ones I reserve for the main focal point of the necklace, though sometimes I’ll “hide” a tiny sparkly bead in between a couple of equally-tiny metallic or pearl beads, just for a little extra interest.
Metallic beads, I find, are great for spacing apart pearl or sparkly beads–they are the “in-between” texture, since they can function as light-catching, but they can be less so if they are darker in color. Thus, they work great in just about any kind of project, no matter the length or complexity. You just need to make sure the color of the metal complements the other beads you’re using!
Though sometimes I’ll use a whole necklace of pearl beads, I generally like to intersperse them with metallic or sparkly beads, since their more subtle shimmer pairs well with the shinier textures. It seems they help set off the colors in the sparkly beads, especially if they are in the same color family.
Patterns and Project Ideas
Now that you’ve got ideas for using different beading textures together, here’s a few links to get you started on various beading projects and patterns. Happy beading! 🙂
Off the Beaded Path Project Ideas and Patterns
FaveCrafts.com Beading Patterns
KandiPatterns.com Bead Design Tool
CraftBits.com Bead Craft Ideas
OrientalTrading.com Beading Projects
Delicate Beaded Jewelry: Not an Oxymoron
With the current beaded jewelry trend tending towards huge rocks strung on string (I’m not kidding), those of us who are drawn toward more delicate, light creations may feel somewhat at a loss.
But there is no need to despair: there are several ways to bead necklaces, bracelets, and even earrings and rings that don’t look like you just went to a jewel mine and dug something out of the wall. I was honestly quite surprised to find several tutorials and ideas for such beautiful beaded jewelry styles, so I collected my favorites and have shared them here. No heavy multi-stranded necklaces or chunky earrings here–just truly lovely pieces of wearable art!
 Ombre Crystal Necklace Tutorial |
 Pearl Drop Earrings Tutorial |
 Lacy Clover Bracelet Tutorial |
 Beaded Rings Idea Post (you have to “like” the Facebook page to get the tutorial) |
 Blue Beaded Bracelet Idea Post |
 Beaded Flower Necklace Idea Post (you can purchase the tutorial) |
…and I am definitely going to try the beaded rings and pearl-drop earrings tutorials. 😀 😀
My 5 Tenets of Beaded Jewelry Design

I consider myself still an amateur beader in many ways, but I like the process of coming up with new designs for the simple, delicate necklaces I favor. I might not be able to weave thousands of tiny beads together into a wearable maze of color, but I can at least string some pearly and sparkly beads on a wire! 😀
I’ve noticed, though, that I tend to use a certain set of rules when it comes to creating beaded patterns, though–and those rules sparked the idea for this post! Read on to discover how I design my pieces!
Tenet #1: Use smaller beads at the ends of the piece and larger beads in the middle of the piece.
This technique, called “size graduation,” is one of my favorites, especially for necklace design. You start out with small beads at either end of the necklace, and then use larger and larger beads till you get to the center of the piece. This draws the eye to the center of the piece, and also helps the wearer know where the necklace is supposed to be centered!
Tenet #2: Make patterns of interlocking symmetry.
I usually do lots of small patterns to make up my necklaces and bracelets. For instance, on either end of the necklace, there’s usually a couple of little symmetrical patterns; then, closer to the center of the necklace, there is a larger symmetrical pattern that surrounds the centerpiece (usually one to three large beads). All together, this necklace pattern looks like a wearable palindrome, both sides mirroring each other.

Pattern: tiny pink pearl–clear seed bead–tiny white pearl–clear seed bead–tiny pink pearl. This would be great at the ends of a necklace.

Pattern: clear seed bead–tiny pink pearl–small white pearl–tiny pink pearl–small tan/gold pearl–tiny pink pearl–small white pearl–tiny pink pearl–clear seed bead. This longer pattern would be great for building up toward the center of a necklace.
Working with small units of patterns like these seems to create a much better-looking product than some of the non-symmetrical designs I’ve attempted over the years. Somehow, I never finish the non-symmetrical designs–I don’t even get around to stringing them. The symmetrical ones, however, always end up finished. 🙂
Tenet #3: Use colors that play well with each other.
In most of my pieces, I sprinkle in a good bit of neutral and metallic colors, like white, clear, gold, tan, black, silver, or gray–and then I use one or two stronger colors that stand out. Old favorite combos like pink and gold or blue and silver also work well for me. Sometimes I’ll use all beads of the same color but in various finishes to achieve a neat effect (sparkly purple, for instance, looks very different from pearlescent purple).
I do occasionally like to weave in a few distinctive beads, but that’s usually saved for the centerpiece of a necklace, using patterns of more “ordinary” neutral beads around it to visually support it.
Tenet #4: Different light textures are welcome.
What I mean by “light textures” is how the light bounces off each bead (as mentioned briefly above). Sparkly beads sharply reflect light, while pearlescent beads softly glow, and metallic beads shimmer. By putting the three different textures together, you get a neat effect on the eye–the eye constantly moves around the necklace, taking in the different sparkles, shimmers, and glows.
My favorite necklace, by far, is one that I made using light teal sparkly beads (Pacific opals) and white pearls, with clear and silver seed beads as accents. It always gets delighted comments when I wear it, and I think it’s because of the different light textures (plus the pretty color combination).
Tenet #5: Don’t go too big.
I like to use smaller beads because it lends a delicate, fairy-like look to my jewelry designs. In small sizes, any sparkly beads are pretty rather than flashy, keeping the overall effect clean and modest. It also doesn’t draw attention away from the outfit as a whole, but enhances and plays up the good parts of the ensemble. (Given that I’m pretty clumsy, I don’t like to wear any jewelry that I could potentially get tangled up in or injure myself on, so that’s probably another reason I go for short, simple jewelry. :D)
Summary
Small, balanced designs with colors and textures that play harmoniously with each other represent the five rules I go by when making beaded jewelry. But what do you think? What are your favorite ways to design? Tell me in the comments!
Getting All Beaded Up

It was a random side trip to Walmart that started it. I found myself in the Fabric and Crafts section, staring down a glittering aisle I’d not bothered to travel before–the bead section. Literally hundreds of cards full of beads hung on the racks, in varying shades and amounts of sparkle and glimmer. How had I never seen this aisle before?
Pretty much out of the blue, I picked up a few cardfuls of beads that interested me, plus a couple of “Instant Necklace” kits, with the appropriate silver clasps already attached to the wire and cut to size. Two necklaces later, I was absolutely hooked on creating my own beaded jewelry.
The following pictures are of necklaces I created using the Instant Necklace wire kits plus my own selection of beads, arranged in self-created patterns. The Instant Necklace kits are cut to size, but some of the beading patterns did not take up all the room on the necklace (mainly because I needed room to handle the wire long enough to thread it through the other side of the clasp). Thus, they might be a little bare in spots, but they wear well once they are on.
Samples of My Work

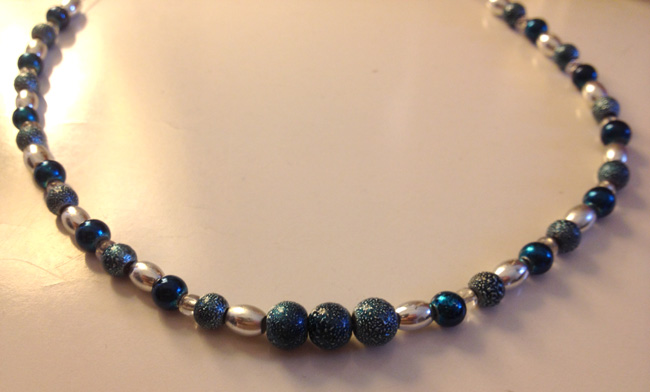
This was my first necklace, but certainly not my last. I loved alternating the silver and dark blue, denim-patterned beads, and this is still one of my go-to necklaces when wearing blue, black, or white tops, though it can also go with gray and even red on occasion.

This is one of my favorite necklaces I’ve ever done, because it is BLUE and SPARKLY. 😀 It makes me happy. Not to mention that I enjoy the play between pearls and gemstones, managing to create a weightless look without too much effort. Since I wear a lot of teal and white, this necklace sees a lot of wear especially in the summer. (This necklace’s wire was accidentally bent in two places during an aggressive airport baggage check, which accounts for the odd angles in the picture, but it straightens out well when I wear it.)

Even though this one was a bit of a color stretch for me, I’ve found myself wearing it more often than I thought I would. I have some purple tops that go well with it, but it has surprised me how well it wears with other colors–even pink shirts look good with this!
My Personal Beading Style
The trend in beading today may be big, chunky, earth-based necklaces, but I prefer my beaded jewelry to actually look, well, like jewelry: polished, pretty little stones, delicately set together. Thus, I choose small beads over large, and I like to combine sparkly beads with pearlescent ones on the same necklace for pretty variations.
Most of how I put necklaces together is rather instinctive; I look at a selection of beads in a store and think, “Ooh, I have some pearls that will go well with that.” A few minutes of arranging the beads back at home generally brings me to a setup I like, and I run with it.
Along with my idea of pairing a sparkling translucent bead with a pearlescent bead of same or similar color, I also like to vary sizes along the length of the piece I’m making–usually, the beads in the middle of the necklace will be slightly larger than the ones at each end, and that’s deliberate (called “graduating sizes”). If I do change it up and mix in bigger beads earlier in the pattern, I will generally set smaller, clear beads around each large stone to help it not stand out quite so much.
Lastly, I try to use symmetrical patterns for my necklaces. If I have a pattern started on the left side of the necklace that goes “tiny pearl, tiny gem, small pearl, big gem, small pearl, tiny gem, tiny pearl,” then I mimic that when I get to the right side of the necklace in the same place.
It can be hard to keep up with where you are in the necklace, so I recommend laying out your beads first on a beading tray to get your pattern together. Amazon.com has several beading trays (also called “beading boards”) that help corral your beads and even align them into a necklace-like shape so that you can make your patterns and thread the wire through more easily.
I’m certainly not the most skilled beader out there–I’m still not familiar with all the intricate patterns you can use to make bracelets and necklaces out of, like macrame. However, the single-strand necklaces I make are enough for my jewelry needs, and they are simple enough to master even for my clumsy fingers.
Try Beading For Yourself
For those who are veterans in beading, or those who are completely new to the craft, many big-box stores like Walmart have cheap beads that don’t look completely tacky. Choosing solid colors of beads generally gives you a better product–some of the mixed-color beads end up being ill-made, as I’ve unfortunately found out. There are also a lot of online tutorials and articles which can help you out!
You can also find quite a bit of beads and beading supplies online, or go to an actual beading specialty store–I’m lucky enough to have a beading specialty store in my area, called Off The Beaded Path. Beading specialty stores will likely have beads of better quality, but you will often pay a little more for that quality (which is okay).
In terms of metallic beading wire, necklace clasps, earring pins, etc. (collectively known as “findings”), you’re better off going to a specialty store or looking online. Walmart had those Instant Necklace kits that got me started, which were great for me because I didn’t have to fool with putting the clasps on the wire myself. But if you want to build the necklace completely from scratch, you will find more variations in color and style going to a specialty store.
I tend to blend my big-box-store finds with my specialty-store finds to make pieces that are at once fairly inexpensive to make and expensive-looking. Try combinations of your favorite colors and favorite textures of beads, and experiment as much as you can!
Beading Links
Beadage.net – projects, instructions, beads available online
BeadingDaily.com – daily ideas, tutorials, and patterns
BeadingTimes.com – every month, a new issue, with articles about how to market your jewelry, how to come up with original designs, and lots of other topics!
Free Patterns @ Beadwork.About.com – free beading patterns
TheBeadCoop.com – patterns to download and print