Tag Archives: advice

A Little Creativity Pep Talk

Feeling remarkably un-creative these days? You’re not alone!

Creativity, for me, seems to ebb and flow like the tide. At “low tide,” I end up staring at my works, adding a little bit here and there sometimes, but usually just reading it/playing through it and not making changes at all. But at “high tide,” I stay awake all night working on a project because I know I’ve got to “strike while the iron is hot,” and boy, is my brain ever on fire! LOL!

The wonderful thing? Both of these levels of creativity, and all levels in between, are perfectly NORMAL. Even if you feel stuck at “low tide,” or even if you’re wondering where most of your creativity “water” went, you don’t have to stay there. Relax–the more you worry about being non-creative, the less creative your brain can be!

Here, I’ve gathered a few visual quotes that have helped me when I’m feeling particularly “ebbed out” with no inspiration. Enjoy, and get re-inspired!

creativityenemy
Source

seewhatsunseen
Source

creativeadult
Source

notperfect
Source

childartist
Source

losefear
Source

curiositysurvives
Source

intelligencehavingfun
Source

creativitytakescourage
Source

uncertainties
Source

quotes_destiny
Source

4 Simple Tips for Writing Poetry

As a poet since at least the age of 7, I’ve experimented quite a bit with writing and reading poetry, working with word choices, line breaks, rhythms, punctuation, and several other tools to help get just the right effect for my poems. For me, poetry is very natural and has always been so.

But for some, poetry can seem at first like the most approachable and the most difficult literary form out there. Sometimes it seems like poetry is so “simple” that it’s easy to over-complicate it or mess it up.

If you’re new to poetry (or even if you’re not), try out the following 4 tips to create and shape your own lines. You might be surprised at the grace your words can have!

#1: Read Your Poetry Aloud

This is the first and probably best overall tip for writing poetry–reading your words aloud can help you solve most poetry issues, such as off-beat word rhythms, weird punctuation, awkward word choice, and the “flow” of lines together. Plus, it can help consolidate the idea behind the poem, so that you can cut out unnecessary material if need be.

#2: Play with Line Breaks and Spaces

Poetry can have a visual effect as well as a verbal and mental effect. Check out the differences in these three examples, all identical except with regards to line breaks and spaces:

Example #1

you smiled
and my watch stopped ticking
you spoke
and my heart and breath waited
to make sound
so they wouldn’t drown out
your voice

Example #2

you smiled
and my watch
stopped
ticking

you spoke
and my heart
and breath
waited

to make sound
so they wouldn’t
drown out
your voice

Example #3

you smiled and my watch stopped ticking
you spoke and my heart and breath waited
to make sound
so they wouldn’t drown out your voice

The line breaks and spaces in a poem give the reader’s eye a little rest, as well as implying small pauses and intakes of breath. As for the “correct” line breaks and spaces, it’s all subjective; it’s all up to your interpretation as to what “feels right” in your poem. (Side note: of the three examples above, I like #2 the best–the short lines lend a slightly breathless quality to the words of this love poem, and the amount of spaces make me think of halting, stuttering, “first-date” kind of feelings. Which example do you like best?)

#3: Use Your Natural Language

You will get the most natural and flowing poetry if you use words and phrases that are natural to you. Don’t get me wrong, it’s nice to have a few “vocabulary words” in your poetry every now and again if it makes sense, but your poetry doesn’t have to look like a dictionary or thesaurus threw up in it, either.

Trying to use unfamiliar words can make poetry feel stilted and un-expressive–the last things you want your poetry to be. Make your poems sound as much like you as possible, warts and all; after all, you’re the only one who can write like you!

#4: Commas or No Commas? That’s Your Discretion (Mostly)

Punctuation in poetry is a relatively thorny issue–some folks say you need it, others (like me) think that line breaks/spaces can achieve the same goal without cluttering up your verses. But there’s really not a wrong way to use punctuation in your verses, since poetry is not just communication, but art.

Do whatever looks and feels natural for your poetry, whether it’s putting punctuation in or not. Just please try to avoid the following style, which I call “comma-itis” (LOL):

when a poem,
has commas at the end,
of every line without,
really making sense,
it really annoys,
most readers,
no end.

Summary

Poetry doesn’t have to be daunting–trying any one of these tips (or all of them together) can help you write a set of beautiful verses. Put pen to paper (or open a new text document) and see what you can come up with!

Hoarder Confessions, part 3: The Hoarder’s Assistant

If you’ve ever tried to help anyone else clean their house out, you know how physically difficult it is, even if the person hasn’t hoarded things. From personal experience, however, I can safely say that helping a hoarder clean things out is about 3 times as physically exhausting and about twice as emotionally exhausting–for all parties!

So, if a hoarder in your life ever asks you to help them with their home, you can rely on the following road-tested guide as you work. This will keep you both less frustrated and more productive (and won’t destroy your friendship along the way)!

While They Sort, You Clean

One of the most irritating things about cleaning out a hoard is finding all the collected dust and dirt all over items, the floor, and even the walls sometimes (depending on how stacked-up the hoard is). When I’m trying to clean out my own collection of stuff, having to dust, sweep, and wipe off everything is a HUGE distraction from my real task. So, as the hoarder’s assistant, your primary task is to clean–dust surfaces, mop, sweep and/or vacuum newly exposed floor areas, wash or wipe off usable items, etc.

This takes a lot of the “cleaning” pressure off your hoarder friend so they can focus on the monumental task of sorting and purging items; it also serves as a confidence boost, as the hoarder sees progress being made. (Plus, it keeps you from having to figure out what to do with all these items which have no meaning to you–see next point.)

Don’t EVER Throw Anything Away Without Hoarder’s Permission

Speaking as a hoarder myself, this is my worst nightmare: somebody coming into my house like a tornado of cleaning power, and throwing away EVERYTHING in sight, no matter what it means to me. You might think a brutal purging spree is “just what they need to get started,” but I’m telling you, that’s a friendship-destroying move right there.

Clean and straighten to your heart’s content, but do not throw ANYTHING away until the hoarder has had a chance to check it. Something that looks worthless to you may not be worthless to them, and it will make things a lot less emotional if you just let them deal with it. One helpful tip: if you come across items that look more like garbage
(old receipts, broken/dented objects, crumpled papers with writing on them, etc), create a separate box for them so that they’re not just scattered atop more obviously keepable items. (If they’re having difficulty getting rid of even a wadded-up food wrapper or some crumpled gift wrap, however, gently encourage them to think about what use the item would have.)

Allow Breaks in the Cleaning Process

Both you and your hoarder friend will need breaks fairly often, due to physical exhaustion if nothing else. Breaks are necessary, otherwise your energy will flag early on and both of you will be sorely tempted to quit. When you take breaks, by the way, leave the room you’re working on and go somewhere cleaner, even if that means leaving the house so you’re not just sitting there surrounded by all the work you need to help with. This will refresh both of you, and make the process a lot easier.

Do Not Judge or Ridicule–Just Help and Listen

For a person who is trying to recover from hoarding, a purging process is not only physically demanding, but emotionally distressing. The hoarder can feel shame that they “let the house get this bad,” or they can spend the whole time fearing that they’ll “accidentally throw away something important.” (These are in quotes because I’ve thought these very phrases myself.) Hoarding is often a secretive, intensely private habit, and when another person becomes privy to the secret, it can leave the hoarder feeling painfully vulnerable.

As their assistant, then, you need to be as soothing and trustworthy as possible as you work alongside them. Your hoarder friend will need a lot of support and reassurance–they may need to talk out their feelings about the process, or they may even cry while working. Be there for them, facilitate the process of purging and cleaning as much as you can, and keep any negative words to yourself, since discouragement or judgment in any form can be more hurtful than you ever imagined.

If They Get Daunted, Help Them Restart–Or Find a Stopping Place

During my massive cleanouts, I tend to get daunted very easily; sometimes, I just look at the enormity of the task and want to either cry or vomit. I feel safe in guessing I’m not the only hoarder who reacts this way, either!

If your hoarder friend is getting daunted early on in the process, it’s up to you to be their cheerleader; you can keep dusting and mopping as they rest, visually demonstrating the progress you both are making, or you can stop and give them a pep talk. Keep it all positive, though–don’t shame them for this reaction, but help them conquer it!

However, if the purging process has been going for quite a while (several hours), and the hoarder is getting daunted because of mental and emotional exhaustion, it’s better to find a stopping place rather than to push them to keep working. Finish the section you’re working on together, and let that be enough–remember, this hoard wasn’t built up in a day, so it won’t be taken down in 24 hours!

Summary

When you’re helping a hoarder in your life, it will be demanding on you, but it’ll be even more demanding to them. Being a positive, encouraging, helpful hoarder’s assistant will be key to them finishing the job. Trust me, we recovering hoarders REALLY appreciate awesome people who are willing to help!

Hoarder Confessions, part 2: Help for Hoarders

As I discussed last week, hoarding is not a “weird” problem–it’s actually something that a lot more people do, and while some people are happy living with their various collections, some hoarders, like me, feel trapped by it.

I speak mainly from my own experience, having been a hoarder as long as I can remember. My main reasons for hoarding: I hate throwing away items that cost a good bit of money, even if they aren’t doing me any good anymore, because all I can see is dollars going in the trash. I also hate throwing away broken things, because all I can focus on is the waste of a good item…I end up keeping some broken things in the hope that I can somehow clean them up and fix them to work again.

However, one can only keep so many items before the collection begins to overwhelm your life. I am now in the fourth year of trying to dig out my life from amid the detritus…it’s not been an easy road, to put it mildly. But I’ve discovered a few tricks along the way that are helping me break through, and I hope this article will help fellow hoarders as well!

#1: The “Month Box”

monthbox
The boxes pictured above have been the biggest help to me in deciding what to keep and what to get rid of. I call them the “month boxes.”

How It Works

The “month box” is a temporary storage place for items that need re-evaluation. Often when I’m cleaning and organizing, I become overwhelmed with the weighty task of discarding and purging items. Sometimes I’m getting rid of so much stuff that it makes me anxious. What if I’m getting rid of something I’m going to need later, just because I’m caught up in “purging?”

This fear has brought cleaning and organizing to an utter halt in the past; to ease the fear of discarding an important item, I have the “month box” set aside for items which I don’t really want to get rid of, but which I’m not sure that I need to keep. The ideal “month box” is small enough to keep it from becoming a junk storage place in its own right, but is big enough to hold a good number of items. (I’ve got two “month boxes” going at the moment, simply because one box has a couple of big, more fragile items and the other has a lot of smaller items.)

The most important thing about the “month box:” if after one month has passed, I have not touched any of the items in the box, then they can likely be safely purged.

This has helped me keep on cleaning and organizing without so much of the crippling fear of “losing something important,” and it also holds me accountable for either keeping or purging items at the end of a set time frame. (That box on the left is coming up on its month deadline here in about a week…eek, I better get moving on that!)

#2: The “Important Box”

I don’t know about other hoarders, but I do know that my house’s mess tends to “eat” important things, like medical paperwork, keys, bills, phone chargers, car registrations, spare change, appliance manuals, etc. The mess then regurgitates these items in various random places throughout the house…I kid you not, I’ve found spare change in kitchen drawers, thin appliance manuals stuffed between stray towels in the laundry room, and all sorts of weirdness.

When you’re trying to purge, these items serve as a HUGE distraction. All of a sudden, you have to shift out of “purging” gear and into “save-this-item” gear–you have to absolutely stop everything you’re doing and go find where this item is actually supposed to be. VERY ANNOYING, especially for us hoarders who have a hard enough time shifting out of “save-this-item” gear in the first place!

Thus, the “important box” is a set place where these items can live until you’re otherwise done cleaning and organizing the space you’re working on.

How It Works

As you discover important items hidden among the hoard, just stow them in the “important box,” and make sure that the box doesn’t get mixed up with other cleaning/organizing boxes. (I use a small, bright blue plastic bin as my “important box”, which stands out among the white bins and random boxes I usually use for cleaning and organizing.) Keep the “important box” close at hand, but not directly in the way of your flurries of cleaning effort.

Once you’re done cleaning and organizing for the day, it’s time to deal with the contents of the “important box.” This is imperative–if you don’t empty the box at the end of your purging, then it’s just going to attract more junk to lay on top of it. Trust me on this. Take the “important box” around the house with you, putting like items with like, until the box is empty; THEN you are officially done organizing for the time being! (For instance, put the random appliance manual near the appliance itself; put the keys near the door or in a purse as appropriate, etc.)

The “important box” keeps you from getting distracted and bogged down with one item while you’re trying to tackle a large organizing/purging project. Believe me, it works a lot better this way!

#3: The “Sorting Chair”

For me, the process of purging, cleaning, and organizing is physically exhausting, as well as mentally stressful. Not only do I feel like the purging process is about as easy as wading through quicksand, but I rarely have anywhere to sit while doing it. Usually the nearby flat surfaces, including chairs and beds, get covered with sortables in a matter of seconds. My injured joints and flat feet can’t take the strain of standing for even half an hour, and so sometimes I quit the cleaning and organizing project before I’ve even properly begun because of pain.

Thus, I have found that a simple folding chair works–I call mine the “Sorting Chair” (with a nod to the Harry Potter series, LOL).

How It Works

As you process each small section of your hoard, carrying your “month box” and “important box” along with you, have your “sorting chair” nearby, so that you can sit as needed. Sorting and purging of items can still take place while seated, since you can set a trash bag beside you and your Month Box and Important Box nearby, but at least you’re not getting as exhausted.

You wouldn’t think just a place to sit would be any help to organizing and cleaning, but it can help you regain some energy and keep you from getting tired so quickly. Cluttered collections in and of themselves are visually and emotionally daunting to tackle, so don’t give yourself any other excuses to quit. (Again, trust me on this–I’ve lived this truth often enough, sadly.)

Plus, if you’re able to stand for longer periods of time and don’t need your chair as much, it can also serve as another flat surface to work off of, whether you need to move a stack of stuff so that you can get into other areas of your house, or whether you just need a higher place to set all those magazines for a minute while you sort and purge them. (Bonus: when you’re finished with the chair for the time being, you can fold it up so it doesn’t take up extra organizing space!)

Next Time: The Hoarder’s Assistant

If a hoarder in your life has asked you to assist with their excavation project (hey, sometimes dealing with your collection is kind of like an archeological dig!), next week’s article will have tips on how to help. It’s not just a matter of holding a trash bag for them, after all!

Further Reading

WebMD: “Hoarding: More Than Just a Mess”

camelCase and 2 Other Tips about JavaScript Variable Names

When it comes to JavaScript variable names, you have to keep in mind that JavaScript is like many other web programming languages–it’s picky about capitalization, spelling, and spaces. (And when I say picky, I mean PICKY.)

This doesn’t mean that you have to be a perfect wordsmith to write JavaScript code; you do, however, have to debug your code carefully, because one simple typo can cause your whole script not to run. Here are 3 common pitfalls:

Capitalization (Like camelCase)

Often, you’ll see examples of JavaScripts floating around on the Web with object and function names like “myObject” and “getPage.” These are both examples of camelCase, or the act of combining two words together and then capitalizing one or both words’ beginning letters. (This is also called Embedded Caps, nerdCaps, and a whole host of other terms, LOL!)

Since JavaScript is case sensitive, you have to be careful when you’re writing object and function names with CamelCase in mind. “MyObject” and “myObject” are treated as two different objects; “GetPage” and “getPage” are also treated as two different functions. Read over your code carefully and make sure all your variable capitalizations match!

Spelling (Yep, It’s Still Important)

Along with the issue of capitalization, the spelling of your JavaScript objects and functions matters, too. If you spell your function as “myAwesomeFunction” in one part of your script, for instance, and then misspell it as “myAwseomeFunction” elsewhere, then JavaScript treats those as two separate functions, and you likely have a non-working script.

You wouldn’t believe how many times a careless spelling mistake has thrown my coding off. (One tip: if you’re having trouble spelling the name of the function or object, consider either changing the name to an easier-to-spell option, or setting aside the hard-to-spell name in a little text file and copy-pasting it every time it comes up in a script you’re writing.)

Spaces in the Variable Name: Just Don’t

One reason so many JavaScript developers use camelCase or other forms of combined-word variable names is because JavaScript does not like for variable names to have spaces in them. Thus, if you have a multi-word function or object name, you combine the words, but keep the capitalized letters to make it easier to read.

Sometimes spaces can crop up if there’s an accidental line return in the middle of your file; resizing your script file’s window to check for these line returns could possibly help you debug a script that just won’t run! (This trick saved me some hair-tearing when I was a webdesign newb trying to get a script to work…I had NO idea what was wrong until I maximized the window and saw the sneaky little space hiding in one of the function names!)

Further Reading

W3Schools: JavaScript Statements
W3Schools: JavaScript Object Intro

4 PHP Security Pitfalls to Avoid

For PHP developers of both newbie and veteran status, there are always new ways in which hackers exploit our carefully-crafted scripts. We have to keep tabs on newly discovered security holes in our scripts, as well as minding how we construct our pages so that people can’t just inject a bunch of code into our websites, all so that our sites will run the way we want them to, and so our users’ data will be protected.

Thus, I bring to your attention the following 4 PHP pitfalls, which are vitally important for us to be aware of as we build our sites. (Incidentally, this post started out as a “PHP tricks” post, but when I saw just how many blog posts are out there already with that premise (and how many of them advocate unsafe code), I thought it best to research PHP security problems instead. And boy, did I ever discover some doozies!)

#4: Exposing Your Filepaths to Users

Most users won’t care much if the paths to various files on your site are easy to guess (or easily viewable in their address bars). A few users, however, may choose to take advantage of that–not just for hotlinking your images, scripts, etc., but for stealing data that is supposed to be secure! Yikes! If you’re running any kind of site with
logins and passwords, especially an e-commerce site, easily-visible filepaths are BAD!

So, how to fix this? Thankfully, there are fairly easy PHP scripts that can disguise a file’s real path on your server with variables, making it much more difficult for hackers to guess where a file is. For instance, motov.net has an example script that is only 13 short lines of PHP code!

#3: Not Securing Your Databases

As mentioned in #4, MySQL databases with logins, passwords, credit card info, etc. are very juicy targets for hackers. If you don’t build in protections for all this sensitive data, your site could end up being victimized, leaving you with very angry users!

PHP.net has a series of articles on how to design your database for better security, how to securely connect to such a database, and more. Layering database security, just like layering clothes before you go out in the cold, can really help protect your users’ data! (Also, WebmasterWorld’s forums has a post about securing database connections which may be of further use.)

#2: Leaving Your PHP Sessions Open to Hijacking

Any time you have users logging in to a site, you are most likely incorporating a PHP session ID, a unique number that tracks them around the site so they don’t have to keep logging in every time they go to a new page. Unfortunately, hackers can get hold of those numbers if they’re easily guessed or stored in an insecure location (see #3). You might not think somebody could wreak much havoc with just a PHP session ID number, but a hacker could end up stealing somebody else’s whole account with just such a number!

To keep your users’ session ID numbers safe(r), consider some of the tactics suggested on this StackOverflow topic, including SSL connections, randomly-generated ID numbers (instead of incrementally increasing numbers), and sessions that expire within shorter time frames.

#1: Leaving Your Site Vulnerable to SQL Injections

When we PHP developers, especially newbie developers like myself, write MySQL queries pointing to our databases, sometimes we forget that malicious users exist for a minute. We forget to keep our very PHP script files safe from “SQL injections”–that is, targeted code attacks that fiddle with our SQL queries just enough to dig up data from the database, rewrite it, or even delete it all!

To keep your SQL/MySQL code from being fiddled with or just plain overridden, PHP.net has an excellent reference article which explains several code tactics you can use, such as connecting to your database with a user specifically limited to the task you’re trying to complete, checking that the inputted data is the right type, etc. This StackOverflow topic about preventing SQL injections may also be helpful as you tackle this tricky issue.

Summary

All of these precautions may seem unnecessary, especially to newbie PHP developers, but these are all giant security holes that can cause us a lot more headaches and frustration (not to mention user anger). Nip these problems in the bud, and you’ll be saving yourself a lot of time and trouble later!

Naming Your Fictional Characters

As a writer, my largest hang-up has always been finding the perfect names for my characters. I’m very picky–I don’t like to name my characters after real people if I can help it, nor do I want to copy another author’s name choices. But I usually don’t get good ideas for characters’ names as I’m developing the concept; names are always the last thing to come to me when I’m crafting a fictional person.

If you’re a fellow writer with this same problem (or if you’ve ever tried your hand at making a unique fictional character for a role-playing scenario, video game etc.), you know how frustrating this can be. I stayed frustrated a long time, until I figured out something pretty simple to help:

Baby Name Websites: A Writer’s Best Friend

It might seem silly, but baby name websites have given me more ideas for character names than I can count over the last several years.

Some websites give you more history and meanings for the name so that you can decide if it’s a good fit or not; others allow users to submit original names (which sometimes ends up in utter strangeness getting added to the database, but is mostly okay). I don’t necessarily gravitate toward popular names when I search–I instead browse through the database one alphabet letter at a time, seeing which names catch my eye and noting those as I go. (This works fastest if you’ve already got an idea for what your character’s name starts with, but even if you have NO clue what you want their name to be, this helps.)

BabyCenter.com
BabyNameWizard.com’s Advanced Name Finder
Parents.com’s Baby Names
Nymbler.com Online Name Tool

Get Help with Surnames, Too!

If I’m bad about selecting characters’ first names, I’m even worse about their surnames. Thankfully, there are a few websites, mostly based in genealogy and ancestry, which have helped me select characters’ last names. (Like when I search for first names, I usually search by alphabet letter, writing down the ones that strike my fancy.) Investigating the surnames’ meaning is also a great tool for matching up surnames to types of characters; you may not wish to make it match perfectly, but a loosely linked name can be fun.

SurnameDB.com
SurnameFinder.com
FamilyEducation.com’s Surname Meaning Search

Also Try: Altering Interesting Words

If none of the names seem to fit, try taking a descriptive word you like the sound of, and changing or deleting some of the letters to make it sound more like a name. (Examples off the top of my head: “Whitha” from the words “white” or “with”; “Sentyn” from the word “sentimental”; “Tunar” from the words “tune” or “thunder”.) This trick can help especially if you’re trying to create more high-fantasy or mythical-sounding names, or if you’re really, REALLY stuck on a character name.

Summary

Coming up with character names can feel daunting, but some Internet research plus a little old-fashioned creativity can help you name your heroes (and villains) at last! Try one or more of these tips for your next novel, short story, or game!

Wardrobe Purge: Where to Donate?

Once you’ve selected the clothes you want to donate and cleaned and repaired them, you need to find out where to donate your clothes. It isn’t always just Goodwill that needs clothes, after all!

Caveat: Sometimes Your Donated Clothes Don’t Always Go to the Needy

Unfortunately, as I began researching this post, I discovered a couple of articles (over at ABCNews and ApartmentTherapy) that tell of a shadier side to the clothing-donation story–sometimes donated clothes don’t end up immediately clothing needy people in our neighborhoods, but instead are shipped elsewhere and SOLD for profit. (Check out CharityWatch.org to find out about charities like Planet Aid, which has been reselling its donated items instead of just “keeping them out of landfills”). Not exactly what I was intending when I thought of donating my clothes!

Solution: Donate to Vetted Charities–or Better Yet, Community Needs

So far, Dress for Success, Salvation Army, Goodwill, and Vietnam Veterans of America are all good charities for clothing donation. Additionally, you can sell items through eBay and donate to American Red Cross through eBay’s GivingWorks program.

But if you REALLY want your clothing to alleviate an immediate need, donate directly to your local community, as this Moneycrashers article says. Helping out with local church or school clothing drives, donating to local thrift stores and community outreach centers, and most especially donating to homeless shelters and missions can really help! Also, ask around in your neighborhood and see if there’s a needy family who could use the sizes and types of clothes you have–you can just take the clothes directly to their house, no middleman required!

Summary

Though donating clothes to the needy has been a little overcomplicated (and corrupted with greed, unfortunately), there are still plenty of places who will take your used clothing and directly help someone else in need. Just make sure you vet the place first so that you know your donations are going where you intended!

Beginner Beading, part 2: Choosing Good-Quality Beads

When you’re just beginning to bead, as I wrote about last week, it’s hard to know what kinds of beads to choose–there are literally hundreds of different kinds available! And, as I unfortunately learned, not all beads are created equal in quality.

A Cautionary Tale: The Missing Bead

beadednecklace_example When I first started beading, I made this necklace, pictured at left, as one of my first projects. I was very, very proud of my work, especially since most of the beads hadn’t cost that much to purchase and yet rendered such a lovely result, interspersing black plastic teardrop beads with dark blue and clear sparkling crystal beads.
necklace_missingbead What I didn’t know, however, was that one of the plastic beads already had a crack in it, right near the point where the beading wire threaded through it–and one day, it cracked off while I was wearing the necklace. I didn’t notice until I got home, took the necklace off, and realized that the beaded pattern at the two ends of the necklace no longer matched (denoted by the red circles on the image at left).

Learn From My Fail: Choose Better Beads

In order to keep from losing bits off your own beading projects, here’s some tips on which beads to choose (and which to avoid):

Quality Beads…

  • Are made of glass, polished wood, or crystal-like materials
  • Have well-drilled bead holes that won’t catch on the beading wire/thread
  • Do not have bead holes drilled in thin/fragile areas (this was what made my necklace’s bead crack)

Cheap Beads…

  • Are made of plastic or rough wood/stones
  • Sometimes have coatings on them (like iridescence or big pieces of glitter) that wear off easily after being handled
  • Do not thread evenly because the bead holes are drilled crooked

Final Word to the Wise: Shop Local Bead Stores

The best places I have found for quality beads are small, local bead and craft shops, whether you buy in-store or online. Such places often simply take care of their bead stock better, storing and displaying them on flocked jewelry trays which don’t allow the beads to get crushed or knocked off easily. Plus, bead specialty stores often carry the crystal-like beads and other finer-quality stock that will give your beading projects not only a more expensive look, but a longer life. (Lastly, the shop owners can help you select just the right bead for a project!)

Wardrobe Purge: Cleaning and Fixing the Clothes that Go

(Author’s Note: Sorry this second installment of the Wardrobe Purge series took so long–the Procrastinator Queen strikes again. :P)

Once you’ve determined which clothes you want to sell or donate, it’s time to get them clean and fix any small tears.

You might wonder why you should bother with this step, but if you take the time to clean and repair these clothes, you will be saving your thrift shop/consignment shop a lot of time and effort, and making the new owners happy, too. You may even get a better price for your garments if they are clean and in good repair!

Step 1: Mend Small Holes

Before you clean the garment or even try to remove any stains by hand, fix any small holes in the garment. (If you do not sew, look around in your area for a sewing center or fabric store which might be able to direct you to someone.) It’s important that you get holes repaired so that washing and stain removal do not tear them open further.

Step 2: Remove Stains

stainedshirt Tackle any stain, major or minor, before you try washing the garment. (For instance, this shirt at left is one of the ones I’m getting rid of–the giant dark stain under the arm comes from wearing too much anti-perspirant. Regular washing DEFINITELY doesn’t get rid of this–trust me, I’ve been trying!!)
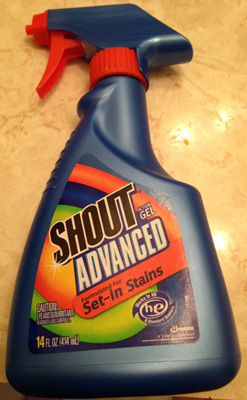
shoutstainremover This stuff, called Shout Advanced Gel for Set-In Stains, is absolutely the best and easiest stuff I’ve ever used to get rid of stains. It has gotten out stuff that I thought the dryer had baked in long ago. If you have an especially tough stain, you can spray this in and wait up to a week to let it work its magic before you wash! (I don’t know how this behaves with dry-clean-only fabric–best to let the professionals handle those, I believe.)

Step 3: Wash/Dry-Clean

Now that you’ve repaired the garment and treated any stains, it’s time to wash or dry-clean it (as appropriate). Just think, it’ll be the last time you have to deal with these clothes if they’re a pain to clean!

Final Notes

After the garment is clean and dry, examine it again to make sure you got all the stains and holes taken care of, and tackle those if necessary before trying to sell or donate it.

If the holes turn out to be too big to mend, or if the repair is too obvious or fragile, do not try to sell the clothing–perhaps donate it to a rag shop or to someone who needs fabric for craft purposes. And if a stain is too stubborn to remove, don’t sell or donate it; you wouldn’t want to buy or get stained clothing, so why try to sell or give a badly stained item away?

Summary

Getting your sellable/donatable clothes in shape is one more step to getting them out of your house. It takes a good bit of effort, admittedly but it’s worth it if it finally motivates you to sell or give away these old items!