
|

|

|

|
Category Archives: Saturday with the Spark
Creative pursuits and life-related happenings.
Beginner Beading: Getting Into the Game
There are a LOT of beading tutorials out there for us beginners…but many of those tutorials expect you to already know quite a bit about the terminology and tools of beading, as I discovered when I began doing some research for this post. If you’re truly a beginner, this can be VERY confusing!
So, for this article, I wanted to help introduce beginning beaders to the lingo and the important tools for making beaded jewelry, as well as giving some bead storage tips and showcasing a couple of basic video tutorials. Let’s begin!
A Few Terminology Tips
 Image source |
At left, this is a jump ring, used for connecting clasps to jewelry as well as other more complex beading tasks. These can be pried apart and squished back together pretty easily with the right beading tools. |
 Image source |
Jump rings and necklace clasps (like the ones at left) are two types of jewelry findings. Findings are generally the metal or plastic bits that are the foundations of any beading project. (Other examples of findings are headpins for making drop earrings, crimp beads for stopping a bead string from moving around on the wire, spacers for keeping beads a certain distance apart, etc.)
See more examples of findings at the following websites: |
Beading Tools
Every beader needs the following tools for even the most basic of beading crafts:
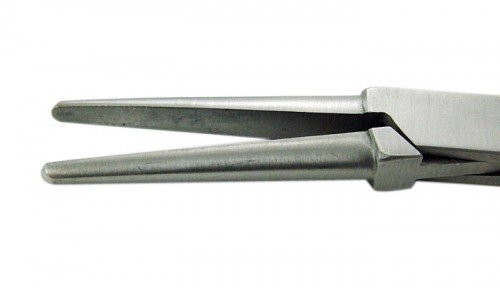
Image source
These kind of pliers, often called “needlenose” or “round-nose” pliers, help you hold delicate projects without squishing them, and also help you twist beading wire for various looks.
 Image source |
Additionally, you’ll need these kind of pliers, called “flat-nose pliers,” for squishing jump rings back together, affixing clasps, and all sorts of things. |
 Image source |
These are called “crimping pliers” (or are just referred to as a “crimping tool”); these can help you hold slippery projects (with the spot marked “F”), and they can also mash down things like crimp beads in the spot marked “E”. |
 Image source |
And lastly, this little tool, called a wire cutter, is immensely helpful when you have excess beading wire at the end of a project! |
Bead Storage

Image source
You can go and buy storage cases specifically designed for beads if you’ve got a craft supply store in your area. BUT, if you don’t, you can also use fishing tackle boxes (get the clear ones with small compartments) or weekly pill boxes. (Also, you can get creative and repurpose some little containers you have lying around the house, such as baby food jars or empty spice containers. Just make sure the lids of your containers close tightly!)
Video Tutorials: Attaching Clasps and Ending Necklaces
How to Attach a Lobster Claw
How to End a Necklace
Further Reading: Beginner Beading Tutorials
Choosing the Right Size Beading Wire
Beadaholique: YouTube Playlist of Beading Tutorials
Making-Beaded-Jewelry.com
Make Your Own Comics with ToonDoo!
If you’re like me, you’re a bit of a frustrated artist–you have great ideas for art and cartoons, but everything you try to draw looks like a kindergartner did it while hyped up on sugar.
For frustrated or accomplished artists and cartoonists alike, there’s ToonDoo, able to help even the most inept of us make cartoons like the following:

How to Use ToonDoo
You need to sign up for an account before you can use ToonDoo–sign up for a Personal Public account (they have large Private accounts for schools to use as well). Once you do that, you can click “CREATE” at the top right of the page, and it will take you to the ToonDoo Creator. Choose the comic strip layout you’d like, and you can begin! (I chose the traditional three-panel strip, but they have dozens to choose from!)

(Click for full-size pic in new window)
Lots of windows and toolbars await you! The ToonDoo button at top left allows you to open and save comics; the rest of the buttons on the top bar give you shapes, scenes, figures, props, text and more to work with.

At the bottom, you have lots of adjusting tools to make objects smaller or larger, rotate and flip them, make them different colors–even give characters different emotions!


Hover over each of the buttons on the top toolbar to see all your options, then click on the one you want.

Add a background–you can choose Indoor, Outdoor, even Fantasy spaces!
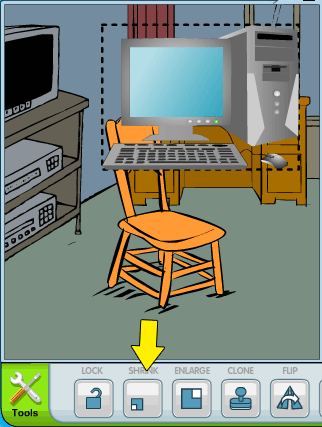
When you add props, you can shrink or enlarge them as needed–just select them with your mouse and then click the “Shrink” or “Enlarge” buttons on the bottom toolbar.

Or you can flip them horizontally if you need them in a different position. Select the prop you want to flip, then click the “Flip” button!
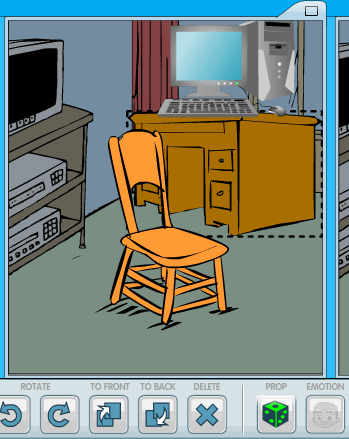
You can even turn props to be at a different angle–check out how the desk is turned from the previous picture. Select the prop you want to turn, and then click the Prop button (looks like a six-sided die) several times to see all the different ways the object can be presented.

You can also add text and characters in the same way, using the top toolbar to select what types you want, and using the bottom toolbar to fine-tune the positioning and presentation. (Sorry I didn’t get a screenshot of the “adding characters” process–I got kinda carried away making my comic :D)
Once you’re done with your comic, make sure to click the ToonDoo button at the top left of the screen and select “Save;” this will let you put in your comic’s title and tags. Then click Publish! (Important: Wait until you get a confirmation message that “your comic has been published” before navigating away from the creator page.)
Give this a shot if you’ve got a spare 15 minutes–see what you can come up with!
The Oldest Song in the World
How old is the traditional Western music scale? Well, according to the discovery of “the oldest known song” on a few clay tablets in the Middle East, it’s a lot older than musicologists once thought! Check out the videos below to hear this haunting melody from 1400 B.C.-era Syria:
The Oldest Known Melody (lyre portrayal)
And here’s a MIDI version of the tune:
The Oldest Song in the World (MIDI version)
The first person to translate this song, Prof. Anne Kilmer, discovered it in 1972 after years of research and work on clay tablets unearthed in Syria during the 1950s. One of the tablets, written in the Hurrian language, contained complete words, music, and performance instructions; she found that it was a religious hymn to the moon god’s wife, Nikal, and was likely sung with accompaniment provided by a harp. Many people have since recreated it using modern musical notation and instruments, as the first embedded video above demonstrates.
This discovery changed much in the study of music history; it proves that “Western” music scales predated ancient Grecian culture, which was previously thought to be where modern music got its start. Amazing, huh? (And even more amazing, we can actually experience a tune from so long ago, hearing it just as its original listeners did!)
Further Reading
Amaranth Publishing Article
The Oldest Song in the World: WFMU’s Beware of the Blog
Shower Time = Creativity Time
Some of my best ideas have occurred to me during the time I spend sudsing up every day. I don’t know if it’s the rushing water around me, the sensation of getting clean, or just the fact that it’s probably the first time in hours that I only have one task to concentrate on. Whatever the reason, I sometimes end up with a breakthrough idea, or a new way to study the problem I’ve been grappling with for days.
But how do you harness this time for your own creativity? Here’s what helps me:
#1: Turn on Autopilot
You know how to shower–you know what needs to be scrubbed, what needs to be rinsed. So you can allow yourself to act on autopilot…just let yourself think about whatever comes to mind. If you end up singing a little melody you’ve just come up with, great! If you finally figure out how to organize your kitchen, woot! It’s all for the better. Every idea is a victory, no matter how small it might seem to someone else.
#2: Talk Out Your Idea
You might think it’s weird to talk in the shower, but don’t worry about it–people sing in the shower, so why not talk? Talking (or softly muttering, if need be) puts your thoughts into more coherent form, instead of your ideas being stuck to some giant mental spiderweb of frustration. If you have a hard time keeping your thoughts on track (like me), this trick can really help you stay focused.
#3: Write It All Down ASAP
Once you’ve hammered out the idea mentally and/or verbally, don’t forget to write down everything so you don’t forget it. You don’t need anything fancy for this–you can just start keeping a notepad and pen in a drawer in your bathroom for such occasions. (Just don’t let the notepad get wet!)
Summary
These 3 simple little tricks have helped me use my shower time not just for cleansing and relaxation, but for brainstorming as well. Why not give it a shot? You might find that your creativity benefits from a shower, too!
Repurposed: Jewelry Organizer
After the success of displaying all of my wearable necklaces and dangly earrings with a pretty little jewelry tree, I felt pretty confident about finding all the jewelry I had when I wanted to wear it.
Well, I felt confident, that is, until I realized I didn’t have a good place for the tiny earrings and my rings, not to mention the long hair chopsticks that wouldn’t fit in my hair notions organizer. Then my enthusiasm dulled a bit.
I was at a loss for a little while, mostly because I didn’t have room on my dresser for a large jewelry box (thus the reason for the tall and narrow jewelry tree). Nor did I want a fully-enclosed jewelry box, which would keep me from seeing everything at once and make me have to dig through a box to find things. In my experience, if I can’t see it, I won’t wear it, sad to say.
So I searched around for an easily-organizable, highly-visible solution to my jewelry problem–and found it in an unlikely place!
Small-Item Desktop Organizer, Given New Purpose!

|
Meet my solution to my “small-jewelry” problem–a desktop organizer originally meant for paper clips, thumbtacks, pens, and the like! (You might not be able to tell from the picture, but it is about half a foot tall and a little narrower than that width-wise.)
My earrings are stored in the four clear compartments (one of which my thumb is on in the picture); my rings are in the little tray up top, and my large hair notions are in the back, stored like pens in the upright holders. This puts everything out in easy reach and easy view, and it looks sleek and classy to boot! |

|
What really sold me on this little organizer is that the clear plastic compartments all swing out for easy access, enabling me to use all the storage space without having to worry about “losing” any items back where I can’t reach it. Having four compartments like this has helped me sort my jewelry to my OCD heart’s content, too!
Also, I like the fact that I can store my rings out in the open, as well as my large hair notions. I don’t have to open any drawers nor fool with any fancy ring holders–they’re just there, ready to be picked up and worn! |

This picture shows just how much jewelry I can fit in this little organizer, and yet still have it sectioned out. Now my earrings aren’t getting tangled up with rings and brooches–yay! And my large hair notions aren’t lying forgotten at the bottom of a box anymore–double yay! 😀
To Buy This Organizer
The organizer pictured can be purchased at Walmart.com for $3.47. Additionally, if you’d like one in all black, this one, also at Walmart.com, is $6.73. And, if you want a larger organizer in this style, I found one with eight swing-out compartments and two top trays at Walmart.com for $13.81.
Fixing a Flat (Character)
As I’ve been writing my novel, I’ve been developing characters to hang like ornaments along the continuing plot threads I’m working on. Unfortunately, there have been a few “ornaments” that ended up more two-dimensional than three-dimensional–they were characters which somehow lacked humanity, even as hard as I tried to inject it into their dialogue and actions.
Well, they lacked humanity, that is, until I figured out a little more unconventional way to think about the situation.
The Problem: A Flat Not-So-Minor Character
This post all started as I was writing the most recent episode in my novel, which involves a female character who behaves very nastily toward my hero pretty much all the time. The nasty behavior was just fine–it worked well in the subplot and I was okay with it overall. But as I kept writing and revising, I kept thinking, “Even I don’t understand why this character is behaving this way…and I’m the one writing her!”
This character lacked humanity, the three-dimensional nature I was looking for, because her actions were not understandable. She was just a really flat character, which would have been okay if she didn’t appear quite so much in these few chapters of the novel. But since she was in a lot of scenes, so to speak, I wanted to make sure the character was worth reading about. (In some cases, the conflict between this character and my hero was almost boring because of this!)
The Solution: Getting Into Her Head
I struggled with this for several days…until one night, it hit me, as I kept asking myself “why would this character behave this way?” That was the answer: I needed to see the novel’s events–and my hero–from this character’s perspective! I needed to understand her thought process, her logic, her worldview.
So I quite literally flipped the script on myself, and began to study the unfolding plot through this character’s eyes. How would she view my hero’s introduction to her world? How were her actions and reactions based on her past experiences? More and more details and explanations emerged, as I fleshed out a possible backstory…suddenly, she became a lot more realistic and believable.
My English-professor boyfriend says that what I did was a bit of Deconstruction literary criticism on my own novel, as I imagined the story from several vantage points rather than staying solely focused on my hero’s point of view. Taking the time to develop this character’s backstory and mindset, even though she isn’t a major villain, helped me understand her better and present her as a believable, human character. (I certainly like developing her dialogue more now, even if she is a bit stuck on herself!)
Summary
If you’ve got a character who just doesn’t seem “real” enough in your book or short story, try getting into the character’s head, developing their life story a little bit, enough to where you can understand where they’re coming from. Who knows–you might just get a whole new perspective on your own story, and write a better character to boot!
5 Wonderfully Weird Musical Instruments
As many traditional instruments that exist in worldwide music, from violins to gamelan gongs, from timpani drums to shakuhachi flutes, there is an even wider world of musical instruments out there–the gorgeous and strange, the “wonderfully weird” combinations of music and sculpture into fantastic (and playable) pieces of art.
OddMusic.com chronicles many strange and beautiful instruments from around the world. Here is just a small sample of these inspired creations:

|
Theremin If you’re a fan of classic 1950s sci-fi films, you’ll recognize the theremin’s spooky, slightly warbly sound. Played with two hands that never actually touch the instrument itself, the theremin uses electrostatic fields around its double antennas to create that unsettling tone. Move your hands within the two fields to control the pitch and volume of the sound, and soon you’ll be expertly weirding your friends out. (Note: the theremin was and still is actually still being built and played today in music outside of film soundtracks. There are actually “thereminists” that play professionally, because the instrument can be used to play actual melodies as well as provide a few spine-tingling notes.) |

|
Rumitone The Rumitone is a musical instrument you can get into–literally! Like a cross between church bells and a playground sculpture, the variously-sized hollow metal cylinders whirl slowly around the player as he or she strikes their sides with mallets, creating a soft wind-chime-like sound. The player can also blow across the tops of the cylinders or bow across them for different sound effects. Playing the Rumitone is as much a dance as it is a musical performance, melding audio and visual into one lovely, ethereal experience for the viewer/listener. |

|
Didjbodhran Who ever thought of combining the traditional Irish bodhran drum with an Australian didjeridu (also spelled didgeridoo)? Barry Hall, the inventor of this hybrid instrument, did! You can play it as a drum with hands or a small stick, as the bodhran is played, or you can blow into the side of the circular hollow frame of the drum to produce the haunting low tones of the didjeridu. Or, if you want to get really fancy, you can do both at the same time, combining melody with rhythm in one handheld instrument! |

|
Windform Whenever you need a 20-foot-long horn, look up the windform–the Australian sculptor Garry Greenwood created this musical sculpture completely out of leather, and it’s perfectly playable! (The flared end of the horn kind of reminds me of a phonograph… :D) It may not sound much different from a regular big horn, but it’ll be a new experience to play a horn that’s as long as a boat! |

|
Sea Organ You won’t be able to pick this instrument up and take it with you, but you can sit on the shore in Zadar, Croatia, and listen as the ocean water itself plays this cunningly crafted set of stairs. Designed and built by Nikola Basic in 2005, the air holes in the top step of the sea organ take in air as the waves push it toward shore, and the hidden set of pipes underneath the stairs produce soft, breathy tones tuned to work together even while played randomly by nature. The random nature of the notes evokes an orchestra tuning up before a concert, and the notes perfectly accompany a peaceful day by the water. |
More Weird Musical Instruments
Explore the rest of OddMusic.com’s Weird Musical Instruments Gallery and find your next favorite sound. Who knows, you might even want to seek out and play some of these instruments yourself!
Don’t Have a Steady Hand for Drawing? Don’t Let That Stop You!
If you are an artist (or a frustrated artist) who lacks a steady hand, fear not: you can still draw even without a perfectly controlled hand! How do I know that? Because you’re not the only one who has difficulty with this–many artists do! And it’s not something that should stop you forever; it is something that can be mastered, often with just a shift in your thinking.
Lack of Confidence in Art Skill -> Shaking Hand -> Lack of Confidence in Art Skill
I used to believe that I was a terrible artist, because of one thing: my trembling hand. Unsteady hands have plagued me for as long as I can remember–I can remember even before entering kindergarten, I had a hard time drawing a perfectly straight line, even when I concentrated really, really hard.
My experience in subsequent art classes in elementary school only confirmed what I already knew: I couldn’t draw anything well, because my lines weren’t clean and sharp-looking like I wanted them to be. I could only sit and marvel at my classmates who could produce beautiful visuals without shaky lines everywhere.
But there was a slight problem with my thinking, as I discovered much later on. Well, let me rephrase that: there was a HUGE problem with my thinking. I considered myself a terrible artist because of my unsteady hand, so I was not confident while I held the pencil or pen; because I was not confident, I always concentrated way too hard when I drew, and ended up with–guess what?–shaking, quivering lines. A vicious cycle!
Though part of my trembling hands may be heredity, I certainly wasn’t helping matters when I focused so hard on trying to draw a straight line. I kept noticing that whenever I was just dashing off a quick little doodle, a drawing I didn’t care about, my lines WERE clean and sharp. It seemed like the less I cared about “getting it right,” the more often I in fact did “get it right!”
A Possible Cure: Just Draw, Don’t Worry
For anyone else who’s struggling with an unsteady drawing hand, the biggest piece of advice I can give you is to just draw. Act as if whatever you’re working on is just a carefree doodle, just a random little piece of art rather than something that has to be absolutely positively right. (I found that thinking this way helped get rid of a lot of my hand’s quivering, because I wasn’t holding the pencil SO HARD trying to get everything right.)
Having confidence in your skill, even when you think you’re not “good enough” to be observed yet, is important for any art, not just drawing. Keeping your judgment separate from the creative process is key. Don’t worry about how it looks on the page, don’t worry if that line looks out of place–just draw for the sheer joy of the art. Reshaping your thinking can be the first step toward becoming a better artist!
Additional Help for Unsteady Hands
If your confidence in your drawing skill is fine, but you’re still having a little trembling getting in the way, check out the advice on this thread over at ConceptArt.org. From moving your shoulder and entire when you draw (instead of just your wrist and hand), to practicing large cursive handwriting to improve coordination (not kidding, it helps!), these artists give a lot of ideas on how to steady your lines!
Writing In-Character Dialogue: 3 Tips
When I’m writing a story, whether it’s my novel, a short story, or even a fanfiction, sometimes there are moments where I struggle with writing the correct dialogue for characters. Sometimes it feels like I’m stuck trying to put the correct sentiment into words that the character would actually say.
This can be a major stumbling block for all writers, especially if you’re writing a longer work in which you feel like you’ve used up all your “characteristic lines” already. But when I get stuck like this, the following list of brain tricks has helped me get on with writing great dialogue:
#1: Read the Dialogue Out Loud
You wouldn’t believe how well this simple little trick works for most dialogue problems. Just say the lines out loud–even mimic how this character’s voice sounds if possible. When you hear it out loud, does it sound like something he or she would say? Is there a word or two that sticks out as “wrong” in tone or word choice? Say it several times if you need to, revising in between each time as necessary, until you feel it’s “right.”
#2: Compare These Words with Other Sentiments This Character Has Expressed
When you’re dealing with a very problematic piece of dialogue, sometimes it helps to compare other bits of the character’s speech from other parts of your written work. How does this line compare with some of the other dialogue you’ve written? Is it too similar, or too different? (Both can be problematic: you don’t want to directly copy what you wrote before, but you don’t want it to be too out of character, either.) Sometimes all it takes is the simple change or deletion of one word or one phrase to make the line fit better with the character, without parroting what was said in earlier chapters. Again, multiple subtle revisions help.
#3: Imagine The Other Character’s Reactions
If the line seems mostly right, but it’s still bothering you, try this: imagine how the other characters in the scene would react. Would they recoil in shock? Would they nod and keep going along as if everything’s normal? (Of course, you also have to decide whether you want the other characters to be shocked or not shocked by what this character’s saying.) This can help you determine whether the dialogue is “correct” for this character or not–you’re basically envisioning the scene in which this dialogue takes place, so it helps you figure out whether it belongs in the context of the situation or not.