Tag Archives: creativity

Making Your Own iPhone Backgrounds

No longer do you have to download pictures from other websites for your iPhone backgrounds, nor do you have to rely on pictures you’ve taken with your iPhone. If you’ve made an image you want to move to your iPhone, you can!

Please pardon my enthusiasm–after a few months of owning my iPhone, I finally figured out how to load self-made pictures onto my iPhone, and I’m very happy about it, as you can tell. 😀 If you’re like me and enjoy playing around in image creation programs, your iPhone provides you yet another outlet for your creative expression; it just takes a little time!

Some Visual Examples!

Here are a few (shrunken) examples of iPhone background images I either made myself or edited:

neptune
glassheart
colorful_lake

sagegray starry

The first three images are edited from images I downloaded from the Internet; credits are at the bottom of this article. The last two are simpler abstract images I made myself.

Here are some tips and tricks I came up with while I was making, editing, and transferring these images:

Image Styles Technical Stuff
  • For home screens, it’s generally best to have more abstract/simpler backgrounds, since most of your picture will be covered up by app icons.
  • For lock screens, anything goes–recognizable images or photos work great, since you’ll be able to see more of the picture.
  • Want to be able to read the app icons’ text? Then make sure your background image is darker so the white text stands out.
  • Images can be in JPEG, GIF, or PNG format.
  • Because you can move and scale the image once you load it onto your iPhone, the picture’s width and length doesn’t much matter–but pictures which are taller than they are wide usually work the best.
  • Keep your file sizes as small as possible without skimping on quality, so that your iPhone’s memory isn’t stuffed full of just background pictures. Photos saved as JPEGs usually have smaller file sizes; so do fairly simple abstract images saved as PNGs.

Putting These Works of Art on Your iPhone

WonderShare.com has an excellent, simple tutorial to help you through transferring your images to your iPhone. If you don’t want to sync all your photos/images to your iPhone, simply make a separate folder for your created/edited iPhone backgrounds, and just sync that folder to your iPhone.

Credits/Resources

There are lots of image resources on the Internet which can provide you with beautiful pictures to use as iPhone backgrounds (and lots more). Here are some of my favorites:

FreeFoto.com
FreeImages.co.uk
Vector4Free.com

Swans on a Colorful Lake Photo

A Day for Writing–Literally

A few Tuesdays back, I wrote about how the Alarmed iPhone app has revolutionized the way I do household chores, schedule blog posts, and do a whole bunch of other things. In short, it’s made me much more organized and on-time doing things. Now I have entire days set aside for things like cleaning the kitchen, tackling cluttered areas of the house, posting all the blogs for the upcoming week, etc.

But I did not mention that this app has also revolutionized the way I write…because I simply did not think of it as a “writing app” until about two weeks ago.

How did a reminder app change my writing habits? Simple: I set aside a “Writing Day” reminder, just like I set aside a “Kitchen Day,” a “Clutter Day,” etc.

writingday This screenshot from my phone shows how Writing Day falls on Sunday every week, sandwiched in between mundane, tiny little tasks. Sunday afternoons are the times I can finally wind down for the week and recharge for the next–it’s a time of reflection, and more importantly, a time of just being able to BREATHE. No one needs my time, no one really needs me to do anything–everything for the week is done, and my time is my own. In short, it’s the PERFECT time to write.

I’ve left myself a simple instruction, too–“You know what to do.” Because I do know what to do on Writing Day–just write. I can write in my novel, I can write in a fanfic or two, I can write anything I want as long as it’s creative. That’s the only rule.

Has This Helped? YES!

This app has already helped me move ahead three pages in my novel. Though it might seem paltry, three pages is a victory, since I’ve been stuck in one place for nearly a year.

Before making a specific “writing day” reminder, I had had a hard time making time to write. It seemed I wrote all the time, either doing blog posts like these, preparing my Sunday school lessons to teach on Sunday, or writing website content…but I hadn’t really done much creative work aside from just little random bits here or there. I ended up almost burned out on writing, just not feeling like I had the energy to write anything when I had free time.

When I finally set aside a special “day” to write, boy, did that change. I’ve begun to write more on my novel, and I’ve started looking forward to Sunday afternoons as “my time,” even. Just allotting a special day of the week to writing makes me feel less anxious about accomplishing my creative writing goals, and less anxiety = more productivity. This is a HUGE change for the better. I don’t force myself to produce a certain number of words or pages when I write this way–I just relax, get rid of all my anxiety about “getting things done,” and just enjoy the process.

Making a “Writing Day” for Yourself

  • Choose a day of the week which is less busy than all the others, or which has mostly non-writing tasks. This is important–you don’t want to be mentally “burned out” on writing before you even begin.
  • How much time do you have during that day? According to your schedule, budget in a block of time to write. It can be 15 minutes, one hour, 3 hours–whatever time you have free.
  • Create a consistent reminder for yourself, either on your phone/computer as I did, or place a paper note somewhere where you will see it every day.
  • When your chosen “writing day” comes around, just write SOMETHING creative. If it’s a few words, awesome. A few lines or a paragraph? Great! A whole page, or even a bunch of pages? Amazing! Count it all as progress, because it is.

I hope this helps you get back on track with your own creative writing–it certainly has helped me!

“Synonym Syndrome”

As I’ve written about before, choosing exactly the right descriptive word when you’re writing is important–words carry not only a direct meaning, but an implied meaning as well, called a connotation.

I noticed this afresh during an impromptu “writers’ club” meeting with my guy friend; we had switched computers to read each other’s stories so far, and I saw that while he had scattered descriptive words all throughout his story, some of them didn’t quite seem to fit the tone of what he meant. Instead of saying “said” a million times, for instance, he had put in apparent synonyms for the word “said”, like “noted,” “stated,” etc. Yet these words didn’t have the right “shade” of meaning in the context of what the characters were saying, etc.

I’ve run into this same problem many times in my own writing–I call it “synonym syndrome,” when you’re trying desperately not to use the same word over and over. The problem comes in when the synonyms you’re trying to use don’t quite match your meaning; they can cause a little confusion in the reader as they try to picture the scene you’ve written.

Examples of Synonym Syndrome

“I can’t believe this is happening to me!” Sandy noted.
“Psst, look over there,” Nathan stated.
“This is my original opinion,” he cited.
“WILL YOU JUST LISTEN TO ME?!” she murmured.

All of these speaking words in these examples do have the basic meaning of speech, but the more subtle shades of meaning in each one render our mental picture of the described action a little differently. It’s hard for readers to imagine a character murmuring in all caps, for instance. When you overuse synonyms like this, which is very tempting to do, it’s almost like your writing becomes a thesaurus in and of itself–it reads in a more stilted fashion rather than flowing naturally.

Some Ideas to Fix Synonym Syndrome

  • First of all, don’t be afraid to use the same word a few times in as many pages. If the right word to describe a character’s speech is “said,” then use “said,” and don’t worry about it. It will read much smoother.
  • As you look at a synonym list, mentally picture the action you’re trying to describe, as if you’re watching a movie form of it. How are the “actors” in your mental scene acting or speaking? Which of the words you’re looking at describes that action the best?
  • If you can’t find exactly the right synonym for an action verb, remember that you can add an adverb, which will spike the verb with a little more descriptive meaning. Just be sure to use adverbs sparingly–they’re like garlic, good in small quantities but easily overwhelming if you put in too much.

    Examples (adverbs in italics):

    • “She sighed tiredly
    • Swiftly, he answered”
    • “The box slid slowly down the slope”
    • “Sinking down into a chair dramatically, she closed her eyes”

Additional Food for Thought: Taking Apart Synonyms’ Meanings

Really take time to dissect the words you want to use. Do they really mean what you want them to mean? This can help you determine whether your word choice is natural or whether it’s got a little synonym syndrome. As examples, let’s look at the words “said” and “moved.”

Synonyms for “Said”

  • remarked – implies that the sentence spoken is either a retort/comeback or a pointed/smart reply.
  • noted – implies a quiet addition to someone else’s comment
  • cited – implies a quotation by the speaker rather than an original thought
  • answered/replied – requires another character to have spoken before to make sense
  • stated – implies a strident or resolute tone of speech, unmovable by others’ opinions
  • muttered – implies a resentful tone
  • murmured – implies a very quiet tone, either of a shy comment or a loving one
  • whispered – implies a quiet tone, but more of passing information secretly between characters

Synonyms for “Moved”

  • stomped – implies anger/frustration
  • tiptoed – implies timidity or caution, possibly stealth
  • glided – implies graceful movement–can be snakelike (negative/evil) or swanlike (positive/good)
  • skipped – implies carefree, blissful state of mood
  • sneaked – implies stealth, usually for an underhanded purpose
  • strode – implies confidence, possibly arrogance or anger
  • moseyed – implies an unhurried, almost lazy pace
  • strolled – a casual walk
  • sauntered – a casual walk with a slight shade of conceitedness/overconfidence; often used when a female character is approaching a male character she’s interested in

The Perfect Pitch Dilemma: A Cautionary Tale

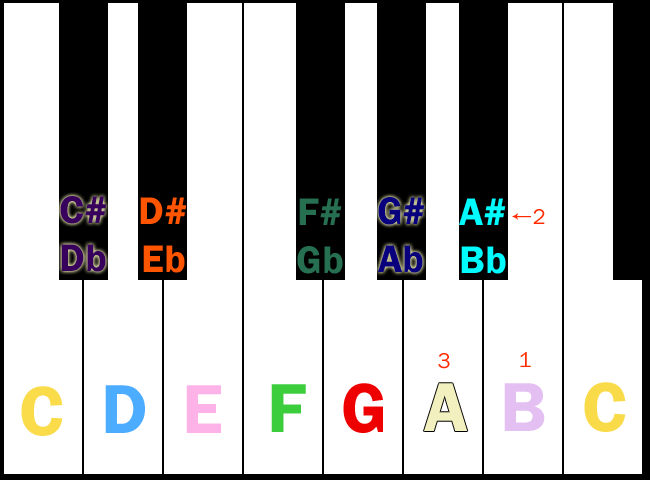
Today, I’ll confess something that’s been rolling around in my brain: At my local Choral Society practice a few weeks ago, I was called on to produce a pitch…and seemingly missed it, by a half-step. I was supposed to produce an A-flat, but I hummed a G.

Though it may seem as though I’ve lost my gift of perfect pitch, the reality is far, far more complex. In fact, the following story strikes to the heart of any artist’s worst nightmare–crippling self-criticism. It’s a cautionary tale for anybody with artistic talent of any sort.

In The Moments Afterward: Self-Accusation Galore

“Has my perfect pitch failed me at last?” was all I could think after it happened, and has been all I can think of for the past month. After all, I have lived in fear of such a moment ever since it was discovered that I even had perfect pitch when I was 13 years old. I knew it was the wrong note the second I began to hum, but I honestly couldn’t figure out quite what was wrong with it until the pianist played a real A-flat and I discovered I was humming a G instead.

God, it felt as though someone had punched me in the stomach! I missed a note?! “What do I call myself now, ‘the girl with imperfect pitch?'” I questioned myself, bitterly. Now, to some, it may sound ludicrous, but this has been a gift I’ve defined myself by, something I’ve labeled myself with. The potential loss of that designation threatened my very identity as a musician, or even as a person.

Finding the Elusive Mistake–Was It Really a Mistake?

The moment I got home, I began to quiz myself, using the keyboard down in the basement. I shut my eyes, turned around from the keyboard, and reached behind me to strike a random note; I named the note I believed it to be, then held the note down until I could turn back around and see what note I had actually struck on the keyboard.

Every time I did this, I was right on the money, no matter what octave. Then I tested myself using intervals, singing the interval between the first and sixth notes of the scale, which is considered the hardest interval to hear correctly in musical ear training. C natural to A natural? No problem. B natural to A-flat? Nailed it–I checked it with my keyboard to be sure. Every six-note interval I hummed and then tested with the keyboard was exactly correct.

Over and over again, I have tested myself, every night for the last month; it’s been one of the many reasons for my incessant insomnia. And every time, I get the notes right; it seems my perfect pitch is just fine.

…So, the maddening question remained: what happened that night at Choral Society practice?

What Could Have Caused This?

I have racked my brain for days and weeks, trying to discover the reason. I produce the correct tones and label them correctly when I test myself; why, then, would an error show up at practice? I tried to take everything into account, trying to discover the reason why I hummed a G instead of an A-flat when I KNEW it was wrong. Some of the reasons I came up with:

  • That week, I had been recovering from mild laryngitis, and my voice had not been working properly most of the night
  • Many people were talking and singing snatches of song around me, causing me to lose focus
  • I was trying to show off and got smacked down by a prideful mistake
  • I second-guessed myself too many times and ended up with the wrong note

The first two reasons were little more than excuses, to be honest; that kind of stuff has never really gotten to my ability to produce pitches before. But as I dug deep and came up with the third answer, I thought I may be onto something. And then, there was the last reason…which, as I thought of it, rang with truth, although I didn’t quite recognize it yet. I largely ignored it, and kept looking for a physical reason my pitch naming had been off.

The Answer is Staring Right at Me

Without realizing that I had already answered my question, I finally discussed this problem with my boyfriend over a late lunch one day this past week, confessing to him my perturbation and distress, my worries that I had potentially lost the ability God had so graciously gifted to me.

My boyfriend, “Logic Man” himself, attacked the problem with his calm reasoning (which is one reason I talked to him about it). He advised that the best course of action was to have someone else test me if I didn’t believe my own test results. He also said that probably no one else had worried about it like I did.

“But they all were there–they all heard the mistake!” I found myself arguing. “They all HEARD that it was wrong!”

You heard that it was wrong,” he replied. “They may not have been able to tell, and even if they could, why would they remember such a petty thing?”

“Because I’m not supposed to miss notes,” I replied, and I was beginning to cry by this point. “It’s supposed to be PERFECT pitch, not ‘imperfect’ or ‘most-of-the-time’ pitch. If it’s gone–”

“You said yourself you’ve tested your ear over and over,” he said, in that calm but firm way of his. “It’s not gone.”

That stuck with me, as I drove home and began to work on other things. I HAD tested myself, over and over, and gotten the same results–my perfect pitch manifested itself repeatedly, correctly identifying musical notes. …But I had done so in the safe confines of my own home–i.e., not in the presence of other individuals who could hear, and who could potentially critique me.

I’ve never had stage fright, to my knowledge, and I have always been confident while performing onstage, whether I’m singing, acting, or playing the piano. But an unlikely parallel flashed into my mind as I thought about this; I remembered being called on to answer a question in math class.

In math classes, I was always terrified to answer questions aloud for fear my answer was incorrect–I knew the jeers and insults I would get from my classmates if my answer was wrong. Thus, I began to get paralyzed with anxiety about my math homework, knowing I would be called on to read out at least one of the answers in class. Some days I got the whole blasted assignment–all 30 questions–wrong because my anxiety held me hostage. Yet, when I was unhurried and doing work that would not be called out in class, I answered most problems correctly.

I began to put the pieces together. I had been doubting my perfect pitch for at least two years, afraid that I was losing it due to hearing damage or sickness or whatever else. And then I was called on suddenly to check a pitch, like checking my math homework. I remembered how I second-guessed and third-guessed and fourth-guessed myself in the seconds before I produced that fateful G…and I remembered how I KNEW WITHOUT A DOUBT it was WRONG the moment I began to sing it. Instinct was veritably screaming in my head that it was wrong wrong wrong, yet by then I lacked the confidence to trust it.

Second-Guessing, Self-Doubt, and Anxiety

Second-guessing ourselves is something many of us do, even without realizing it. But it’s a dangerous, anxiety-causing practice, which worms its way into your confidence and begins to eat it away. In my case, I had been doubting my perfect pitch ability because of my second-guessing, and it had quite honestly become a source of great anxiety–living in abject, paralyzing fear of the moment I miss a note. (That might sound stupid, but as I said, this is a large part of my identity and it means a great deal to me.)

Once I started doubting myself and losing confidence in my ability, even with no proof that it was faulty, I began second-guessing the pitch names that my brain came up with by instinct. Soon, even the easiest pitches to guess became anxiety machines–“am I SURE this is the right note? Am I ABSOLUTELY POSITIVELY SURE?” I always thought.

There was the answer. Anxiety, the thing which had tormented me during all my math and some science classes, had finally attacked me on another vulnerable front: my musical ability. It had caused me to doubt things that should never have been in doubt, and in so doing had wrecked my self-confidence. “What if I’m losing my gift?” I had wondered over and over again. In that light, the fateful G seemed like a self-fulfilling prophecy, but it was really an example of anxiety holding me hostage, making me second-guess myself so much that I was kept from producing the correct answer.

The bottom line: My gift is not lost…but my self-confidence is, because of second-guessing and nothing else. Seems so little and simple, when you define it like that, but it can have a very big impact indeed, as I found out that night.

Why Do I Call This a Cautionary Tale?

I believe this kind of self-doubting anxiety can strike any artist, not just a musician, and not just people with perfect pitch like me. Self-doubt can ultimately lock away our ability to function creatively; it can make us dread making our art, or make us judge our art too harshly. We become irrationally afraid that we’ve somehow “lost our touch,” that “the Muse is gone,” that we are mere shells of the artists we once were.

My story, silly and meandering as it may sound, is a warning. If you are an artist of any sort, don’t you ever let anxious self-doubt get to you. It may seem like a small and paltry doubt at first, but if you let it grow, it will eat your confidence for breakfast and defecate depression before you know it. Soon, you’ll feel too anxious to do your creative work, to do the things you once loved…or you might find yourself making a very silly error, as I did, because you’ve second- and third-guessed yourself. If you get too anxious about your gift being gone, you might just fool yourself into believing it’s true.

3 Tips to Revolutionize Your Creative Writing

After having been stuck on my novel for the better part of a year, I knew I had to do something to light the spark again. I looked at all I’d accomplished so far, and I found myself asking, “How in the world did I ever get to 50,000 words, let alone 150,000, when these days I can barely be bothered to come up with 500?”

You might feel just as stuck in your own creative writing process. It may feel as though those cogs and gears will never turn again, that they are rusted into place. But I have 3 tips that have helped my own writing engine begin to turn over, and they just might help you. It doesn’t hurt to try!

#1: Write What You Really Want To

You have to give yourself a compelling reason to write again once your engine has stalled out for a while. So, if you have an idea that’s simply bursting to come out of your head, write it down. It doesn’t matter if it has anything to do with your current projects or not; write it. If it’s a very future part of your novel, several chapters ahead of where you are now, go ahead and write it–you can connect the plot dots later. If it has nothing to do with anything you’re currently trying to write, go ahead and write it anyway; it’ll help keep those creative wheels greased.

For example, I have several ideas for future chapters of my novel–let’s say these are going to appear in Chapters 14 and 16. But right now, I’m stuck back on Chapter 7 or so. Very, very annoying! But I can go ahead and write those very far-flung chapters; who knows, it may spark an idea for how to finish Chapter 7, and how to build up chapters 8-14 to those next plot points!

#2: Don’t Make Writing a Chore, Make It an Escape

When something’s a chore, it’s not very fun, is it? We dread it, but we put it on our schedules in an attempt to make us do it. Yet many of us creative writers try to mold our writing schedule into “daily writing” programs, or try to follow those “write X number of words daily” plans…and we end up hating to write, where before we had loved it.

I don’t mean to disparage such motivational programs; if they work for you, then do them gladly. But for me, such programs create more anxiety than they solve; I end up anxious about not completing the programs or following the plans to the letter. And believe me, when writing gets associated with anxiety or boredom, you’re in deep trouble as a creative writer. That’s what I’ve run into with my own novel this last year–it’s not that my novel bores me, but that the situation I’m writing is hard to write about. I’ve become so anxious about “fixing” it that I have hobbled my writing ability. Sounds ridiculous, but it happened…and it happens to many more writers, I’d wager.

So, how to break free of this? Make your writing something you do when you need to wind down, something to reward yourself with when you’ve finished a real chore, or something you do when you want to cheer yourself up. Make it an escape, like a favorite book you can’t put down, a favorite food you look forward to eating, or a favorite place you love to visit. Make it FUN again, make it the process of discovery and creation that it ought to be, instead of hedging it about with tons of rules. If you’re like me and have problems following overly structured plans, this might just spark your engine again.

#3: Let Dreams Inspire You

Have you ever woken up from an incredibly intense dream, only to have certain scenes stick with you throughout the day? How about using these scenes as inspiration for your writing? Whenever you have dreams like this, write down the most vivid scenes from the dream in as much visual and sensory detail as you can remember–then save that scene where you can find it easily. You never know when that dream scene may become fodder for a future plot detail! (Being a pack rat is okay in this case!)

For instance, I dreamed a very powerful, evocative scene for a future subplot in my novel about a year ago–I actually woke up weeping and shaking, and it stayed with me for hours. I know it will be a very painful scene to write when I put it into my book, but it will also be a point of great character development, too. So I’ve written some quick notes about it and it’s sitting in my novel file on my computer, waiting to be used alongside a few other little scraps of dreams I’ve written down. The others may never make it into the book, but they just might!

Summary

I hope these three tips help your writing engine start again. Remember, just because it hasn’t cranked in a while doesn’t mean it won’t crank ever again. Unlike old cars, our brains are never rusted!

The Internet: A Creative Crafter’s Paradise

Are you a crafter and feeling lonely or uninspired in your work? Wish you had someone to ask about how to accomplish certain pieces, how to think outside your own little box?

In that case, the Internet is your best friend. Today, I’ll showcase the websites I’ve found in my search for informative and helpful crafting sites for any and all sorts of crafters out there.

Skip to: For All Crafters | Specific Craft Sites | Buy and Sell Crafts | Craft Site Directories

For All Crafters

Community/Help Sites

Craftsy.com
WhatTheCraft
Craftster.org
FunkyFinds.com
CraftGossip.com
Craftgrrl Livejournal Community
CraftsFairOnline
BuildALittleBiz.com Blog
HandmadeArtists Forums
GetCrafty.com Forums

Tutorials

Craftgawker
TipJunkie
Instructables
TipNut.com
OnePrettyThing
HowDoesShe
Arts and Crafts @ VideoJug.com
Makezine.com Blog
TaterTotsandJello
Little Lovelies By Allison
DIYNetwork.com
TheFrugalGirls.com
DesignSponge.com

Inspiration/Ideas

ImaginativeBloom.com
Prima Marketing
MollieMakes
Craftzine Blog
Craftsnob Blog
Crafts @ Curbly.com
ShareSomeCandy.com
NorthernCottage.net
ArtisticBliss
U-CreateCrafts.com
Mayaroad – Creating Stuff
Two Crazy Crafters
TheScrapShoppeBlog
On My Desk
Supernaturale
PrimitiveCrossroads.com
Crafts @ TheDesignFiles.net

Freebies

JustSomethingIMade.com
HelloCuteness
FreebiesForCrafters
Crafts-Beautiful.com
FreePatternSite

Craft Supplies

Michaels
Joann.com Crafts
Hobby Lobby
WoodTurnersCatalog.com
ConsumerCrafts.com
FactoryDirectCraft
Blumchen.com

Craft for a Cause

Ladybird Lends a Hand
Charity Wings News
Beading to Beat Autism
Beading for a Cure

Specific Craft Websites

Scrapbooking

Scrapbook.com
CreativeMemories.com
JessicaSprague.com
A Cherry on Top
My Mind’s Eye
PaperCraftersAnonymous
Scrapbooking101.net

Papercrafts

Cubeecraft
PapercraftsMag.com
PaperCraftersAnonymous
PapercraftParadise
PaperPastime
PaperShapez
Graphic 45 Papers
ISharePrintables

Beading/Jewelry

CraftMemo
Beadage.net
BeadingDaily.com
Beading.com
Interweavestore.com Beading
BeadingTimes.com
You’ve Got to be Beading
Around the Beading Table

Edible/Food Crafts

LiveLearnLoveEat
Tastespotting.com
Edible Crafts (Pinterest)
FunFamilyCrafts.com
TheFarmChicks
EdibleCrafts.CraftGossip.com
EdibleCraftsOnline.com
EnchantedLearning.com

Stamping

Stampin’ Up!
StampingBella.com
CraftySecrets.com
Split Coast Stampers
StampingSchool.com
Stamping.CraftGossip.com
MyCraftyWorld
My Favorite Things Stamps

Fabric Crafts

Lots of Pink Here
See Kate Sew
PurlBee
Knitty.com
CrochetMe
Interweave.com
Threadbanger @ Youtube
How About Orange
HappySeamstress.com

Kids’ Crafts

The Chocolate Muffin Tree
Red Ted Art
Crafts By Amanda
Mud Pie Studio
NaturallyEducational.com
Filth Wizardry
Mia’s Craft Ideas
TinkerLab.com
No Time for Flashcards
Chalk in My Pocket
I Can Teach My Child
Childhood101.com

Furniture/Woodcrafts

SawdustGirl.com
Woodcraft.com
TheCraftyCrow.com
DIY Woodcraft Projects (Pinterest)
Woodcrafts.com
Wood Crafts (Pinterest)
CraftIdeas.info
FaveCrafts.com

Buy and Sell Crafts

SassySteals
Etsy
ArtGirlPottery
HemmaDesign
Brothers-Handmade.com
HandmadeFuture.com
Save-On-Crafts.com
StampingFools.com

Craft Site Directories

CraftSiteDirectory.com
OnlineCraftSites.com
AllCraftSites.com
CraftyTips.com

Upcycling: Transforming Useless Junk into Art/Useful Objects

Plenty of artists have been doing it–making art from trash, I mean. The Web is alive with stories of it: Vivan Sundaram’s trash photography exhibits, as well as trash-to-art-object best-of lists from Noupe and WebUrbanist. Even ordinary folks are collecting pictures of amazing art being created from junk or trash via Pinterest or other such sites, like this list over on Indulgy.

What I love most about this new-old trend in art is that it encourages all of us to recycle and repurpose old things. Too often, we think of creativity springing from an eternally new source–art’s always somehow gotta be new new new and anything old is worthless. But this trash-to-art and junk-to-art movement helps us all revision items in new ways. The movement is even trickling down to children’s art projects through sites like Kid-At-Art.com, which shows kids how to recycle trash and junk and make it into something beautiful.

But how does this trash-to-art movement translate into doable creativity for the everyday crafter/artist? Simple–by saving up materials that others would likely throw away and making/decorating gifts for others, or making and decorating useful objects for your own home.

Upcycling: Recycling and Repurposing All in One

Upcycling, as this article from Shareable.net details, gives old items new purpose, or can give items bound for the trash a new lease on life. Say you’ve got a few random old items which still have some life in them, yet they need a little spiffing up. Upcycling can work for these–giving them a fresh coat of paint and revisioning them can give them a new place in your house!

Example #1: An old train case with a top handle can be cleaned out, repainted/refinished and made into a kid’s treasure box, storage for a teen’s small electronics, or even a mobile office-supplies carrier for your car.

Example #2: An old bread box can be repainted/refinished, then mounted on the wall near the front door as a family mail sorter/key holder…or you can mount it in the living room to corral all those remote controls…or you can put it in the bathroom for small toiletry items (like nail clippers) that always seem to get away!

Or, say you’ve got some items that aren’t in the best condition anymore, that used to hold stuff but don’t anymore, or that have some pieces missing. You can still upcycle these, if you allow yourself to think outside the box!

Example #1: Coffee cans (metal or plastic) can become pencil holders, mail sorters, snack transporters, trinket hiders–soak off the label, clean out the can, and you have a new storage container for just about any small objects!

Example #2: Old VHS or DVD cases can become storage for printed-out photos, important labels, bills, or anything else that needs to be kept away from sun, water, and dust till you can deal with them. Plus, you can slip a changeable label into the outside plastic clearly marking what’s inside!

Plus, what about all those used gift wrap and cards you find yourself swimming in after the holidays, or after birthdays or other special events? Instead of throwing it all away, how about taking a few of these tips:

  • Save any like-new (read: not dented in/half-torn-up) gift bags, folding them up carefully and storing them away from dust and water; you’ll thank yourself when you need a gift bag next!
  • Save all the tissue paper and scraps of wrapping paper, too. You can shred the wrapping paper and really torn tissue paper with a paper shredder to make basket or bag filler, and any tissue paper that is mainly crumpled rather than torn up can be used to fill out the tops of gift bags, or can even be fodder for other creative projects!
  • If you like the picture on a card you’ve received, cut it out and refashion it as a gift tag, decoration for a notebook, or even frame it as art for your walls!

Summary: Upcycling is Crazily Creative!

With these ideas and more, you can make even your own junk pile transform into useful and pretty objects again. All it takes is a moment to stop and think, “Hmm…what could this become?”

Music Theory Fun, part 7: Let’s Read Some REAL Sheet Music

As a tidy ending to this series on music theory, let’s test the music-reading skills we’ve learned with a few samples of real sheet music. (Don’t worry, you can do it!)

For each piece of music, remember to look for and study the following notations–doing it in this order seems to be most helpful for me, at least:

  • Time signature
  • Key signature
  • Rhythms (how long you hold each note)
  • Notes (what pitches you hit)

Sample #1: Auld Lang Syne

sheetmusic_auldlangsyne
Image Credit: TrivWorks.com

An old favorite for New Year’s, likely one we’ve either heard played a good bit or sung. What time signature is noted on this piece? How about key signature?

(If you said “Common Time,” also known as 4/4 time, for the time signature, you’re right! That’s what that little “C” means at the beginning of the first measure, as we learned a few weeks back. Remember what 4/4 time means?)

Also, if you can’t find any key signature, don’t fret–there are no noted sharps or flats, which means that this piece is in C major. (It also could technically be in A minor, but seeing that the many Gs in this piece do not have sharp symbols beside them, it is most likely C major.)

Let’s look at the rhythms, too. Hmm, I see a lot of “dotted quarter followed by an eighth note” rhythms scattered throughout the piece, plus a lot of eighth notes strung together in pairs. What else do you see?

And lastly, let’s look at notes. For instance, how often does the note of C appear in this piece, since the piece is in C major?

Sample #2: Super Mario Bros. Theme

sheetmusic_smb
Image Credit: WiiNoob.com

Here’s a tune a lot of us gamers know! Let’s check it out and see what we can learn from its sheet music. First, look at the time signature and key signature.

(If you said 4/4 time and C major, you’re right again! As with Auld Lang Syne, there are no sharps and flats noted, but that’s a key signature in and of itself–C major.)

How about rhythms? I see quite a lot of eighth notes, but not just any eighth notes–they’re all quick little notes with some fancy-looking 7’s and something that resembles a curly brace in between them. The fancy 7 and the weird curly brace are both rests, which means that you quit playing anything for just a moment. (In the case of the Super Mario Bros. melody, you can probably hear the breath of space in between the struck notes–this makes the notes, when they are played, stand out a bit more, because there’s silence surrounding them.)

And speaking of notes, do you see a few sharps and flats scattered about, hovering right in front of notes? For instance, I see a couple of F-sharps right at the beginning, and a B-flat/D-flat pair in the second measure on the bottom line. Composers do this occasionally, sneaking in weird or cool-sounding notes to make the melody more interesting–these are called “accidentals.” Without those accidentals, this melody would be very different! What else do you see in terms of notes?

Sample #3: Over the Rainbow

sheetmusic_rainbow
Image Credit: SkyBlueMusic.com; click for larger pic in new window

Saved the hardest one for last, but this is a tune you’re still more likely to know. This is a piano adaptation of the popular tune from The Wizard of Oz, so there’s going to be some extra notes and rhythms thrown in there, but don’t let that daunt you! You can decode this just as easily as you did the others.

First of all, what is the time signature and key signature?

If you spotted those three flats right off the bat, good for you! We remember from a couple of weeks ago that to figure out a key signature full of flats, you look at the next-to-last flat in the group. In this case, what’s the next-to-last flat?

(If you said E-flat, you’re right!)

But what about the time signature? …Actually, this particular copy of sheet music does not have it printed on here. But there’s a trick to figuring it out:

rainbow_firstmeasure

  • Look at the first measure–in the treble clef, there’s a half note (held for two beats, as we remember from a few weeks ago), then there’s a pair of notes played together that are both held for two more beats. Then there’s a straight vertical line, separating the first measure from the second. (Ignore the big string of eighth notes for right now. LOL)
  • Two half-notes means four beats, so whatever this time signature is, it’s got 4 beats per measure. So we now know that 4 is the top number of the time signature.
  • And apparently, since they only had room for two half-notes in the first measure, that must mean that the quarter note is counted as one beat–which means that the bottom number of the time signature must also be 4, representing the quarter note. So this is in 4/4 time, too, even though it doesn’t have it printed!

Whew! Well, aside from all that hullabaloo over the time signature, what else do you notice about this piece? I see lots of ornamentation, lots of embellishments on the melody added in (all the messy strings of eighth notes and big chords). This technique is something my Nannie referred to as “playing the doodly-doos” (LOL), and it serves to make the music sound richer and fuller. Looks pretty challenging to play at first, but all it would take is a little practice!

Congratulations! You Know More About Reading Music!

I hope this series has given you a greater insight on reading sheet music, and perhaps even inspired you to start playing an instrument or singing. But, of course, I could not have done all of this had it not been for my own wonderful music teachers over the years, who gave me knowledge, insight, and inspiration–I can only hope I’ve passed that same fire for music on to you. 🙂

Music Theory Fun, part 6: Every Key’s Got a Relative

Talking about major and minor keys, as we did last week, inevitably brings up a question: “How do you mark minor keys’ key signatures? All we covered in the key signature lesson was major keys.”

The answer: To find out any minor key’s key signature, you have to know which major key it’s related to.

Mapping Out the Keys’ Family Tree

For every major key signature, there is a minor key which uses the exact same signature, because it uses just about the same scale (set of 8 notes). The only real difference is that the minor key scale begins and ends on a different note. When we talk about these minor keys in comparison with their similar major keys, we use the term “relative minor.”

(I’m not exactly sure why the people who created modern Western music notation chose to note minor key signatures this way, but it probably saved time and brain space. Instead of having to make 12 major key signatures, then make 12 more key signatures for minor keys, they used each key signature twice, because each major key already had a minor key that was very similar to it.)

To find any major key’s relative minor, simply go down three half-steps from the major key’s beginning note (the note it’s named after). For instance, say we’re trying to find the relative minor of C major, below:

cmajor_selected
Begin on C (the note circled in red on this graphic)…

findingrelativeminor
…and go down in pitch (to the left on this graphic) 3 half-steps. In this case, you’ve landed on A. This tells you that A minor is the relative minor of C major.

What Has This Got to Do with Key Signatures? A Lot, Actually

gmajor So, for instance, when you see the key signature for G major (at left), for instance, the ensuing music might not actually be in G major–it might be in the relative minor key instead. (What is the relative minor of G major? Remember, count three half-steps down from the original key (G major), and you’ll find the beginning note (or keynote) of the relative minor.)

Answer: Below G is F-sharp, then F, and finally E…and E minor is the relative minor of G major. E minor is thus given the key signature of one sharp.

One Important Caveat: That Pesky “Sharped Seventh Note” Again

Remember last week when I discussed that minor key scales are created by taking the major key scale, flatting the third and sixth note, then sharping the seventh–except that the “sharped seventh” is really in the same place as it is on the major key scale? Well, that comes into play here.

When you play the relative minor key, it’ll be the exact same scale as the major key it’s related to, except that the seventh note will be sharped. That change is not reflected in the key signature at all–it’s just something you have to remember. Take the key of A minor, for instance; it’s related to C major, which has no sharps and no flats. But when you play something in A minor, the seventh note is a G-sharp, because that’s just how minor key scales are constructed.

The Complete Key Signature Family Tree: The Circle of Fifths

To remember and reference all these various major-relative minor matchups, music theorists have come up with a cool little graphic called the Circle of Fifths, seen below (this was retrieved from line6.com):

Circle-of-Fifths
Names of major keys appear on the outer “ring” of this graphic, while their relative minor keys appear synced up with them on the inner “ring.” This really helps as a memory tool!

Next Week: A Look at REAL Sheet Music

Now that we know a good bit about the way music is notated, let’s see how to apply that knowledge to real sheet music. That challenge appears next Saturday!

Music Theory Fun, part 5: “Major” and “Minor” Differences

Now that we’ve learned about key signatures and pitches, we can start talking about “major” and “minor” keys in a little more depth.

First, let’s look at a few graphics to help you visualize the “keys” I’m talking about. (I made this based on a piano keyboard, because I am a pianist and learned music theory largely by interacting with the piano. To me, seeing the notes as clearly as a piano displays them REALLY helps with learning theory.)

pianokeys
This graphic represents a small section of a piano keyboard. Here are the notes labeled:

pianokeys_labeled
There are several things to take note of here. First, see how there’s a note labeled C on the left side of the image and another note labeled C on the right side of the image? The C on the right sounds higher than the C on the left–that’s the difference. The pitch names repeat themselves, but the notes get higher going to the right on a piano keyboard, and get lower going to the left.

Second, there are black notes fitting between some of the white notes on the keyboard, and all of them are called “something-sharp” or “something-flat.” That’s going to be important later in this post!

Lastly, each of the black notes have two pitch names instead of one. This is perfectly acceptable; for instance, you can call the note between C and D either C-sharp or D-flat. It’s really just personal preference.

(Oh, and don’t worry about the colors of each note being different–this has to do with my sound-color synesthesia. I was feeling kinda OCD about making sure the colors of each label “matched” the musical note. LOL)

So, What’s So Major about a Major Key?

Last week, we talked a good bit about key signatures, and at the end of the post, I gave you an “answer key,” of sorts, showing all the different key signatures. I also identified all of them as being “something-something major.” But you probably wondered: “What does ‘major’ mean, and why does she keep specifying it?”

When a musician says that a song is played in a “major” key, it doesn’t mean that it’s in an “important” key–it means that the scale of the key (all 8 notes played in sequence) follows this pattern:

cmajorkey
This graphic depicts the C major scale; starting on C (leftmost note), you hit C, D, E, F, G, A, B, C. Looks pretty simple and straightforward, right?

Well, underpinning this simple sequence is a rule concerning how all major key scales are constructed, using intervals. Intervals are what I keep referencing when I say “whole step” or “half-step,” like so:

  • A half-step is the interval between two adjacent notes on the scale, such as the interval between C and C-sharp, or the interval between E and F.
  • A whole step is the interval between two notes with another note squished between them, such as the interval between C and D, or the interval between G-flat and A-flat.

So the interval pattern described for you in the above graphic has you make two whole steps up the scale, then a half, then three more whole steps, then another half. This is how all major key scales are determined–if their scale abides by this rule, they are major!

Minor Key Scales: Some Minor Adjustments to This System

cminorkey
Now, in terms of minor keys, the nice neat little system we saw earlier gets a little bit of a monkey wrench thrown in it. The above graphic depicts C minor, and there are a few differences when you compare it to C major:

  • Instead of hitting an E-natural (“regular E”), you hit an E-flat
  • Instead of hitting an A-natural, you hit an A-flat
  • B natural is still the seventh note, just like the C major, but for some reason, the seventh note is still considered “sharped” (never understood that, myself)

There is a very technical interval pattern for minor keys, but it’s very complicated. Basically, we musicians just remember that for every minor key’s scale, we take the major scale, flat the third and sixth note, and keep the seventh note in the same place.

Next Week: Every Key Has a Relative

Now that you know a little more about major and minor keys, we’re going to see how they’re related to each other, next week. (Thankfully, you won’t have to remember whose brother’s uncle’s cousin is related to whose! LOL!)