
|

|

|

|
All posts by Robin
Beginner Beading: Getting Into the Game
There are a LOT of beading tutorials out there for us beginners…but many of those tutorials expect you to already know quite a bit about the terminology and tools of beading, as I discovered when I began doing some research for this post. If you’re truly a beginner, this can be VERY confusing!
So, for this article, I wanted to help introduce beginning beaders to the lingo and the important tools for making beaded jewelry, as well as giving some bead storage tips and showcasing a couple of basic video tutorials. Let’s begin!
A Few Terminology Tips
 Image source |
At left, this is a jump ring, used for connecting clasps to jewelry as well as other more complex beading tasks. These can be pried apart and squished back together pretty easily with the right beading tools. |
 Image source |
Jump rings and necklace clasps (like the ones at left) are two types of jewelry findings. Findings are generally the metal or plastic bits that are the foundations of any beading project. (Other examples of findings are headpins for making drop earrings, crimp beads for stopping a bead string from moving around on the wire, spacers for keeping beads a certain distance apart, etc.)
See more examples of findings at the following websites: |
Beading Tools
Every beader needs the following tools for even the most basic of beading crafts:
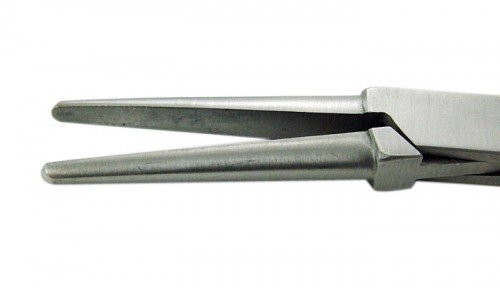
Image source
These kind of pliers, often called “needlenose” or “round-nose” pliers, help you hold delicate projects without squishing them, and also help you twist beading wire for various looks.
 Image source |
Additionally, you’ll need these kind of pliers, called “flat-nose pliers,” for squishing jump rings back together, affixing clasps, and all sorts of things. |
 Image source |
These are called “crimping pliers” (or are just referred to as a “crimping tool”); these can help you hold slippery projects (with the spot marked “F”), and they can also mash down things like crimp beads in the spot marked “E”. |
 Image source |
And lastly, this little tool, called a wire cutter, is immensely helpful when you have excess beading wire at the end of a project! |
Bead Storage

Image source
You can go and buy storage cases specifically designed for beads if you’ve got a craft supply store in your area. BUT, if you don’t, you can also use fishing tackle boxes (get the clear ones with small compartments) or weekly pill boxes. (Also, you can get creative and repurpose some little containers you have lying around the house, such as baby food jars or empty spice containers. Just make sure the lids of your containers close tightly!)
Video Tutorials: Attaching Clasps and Ending Necklaces
How to Attach a Lobster Claw
How to End a Necklace
Further Reading: Beginner Beading Tutorials
Choosing the Right Size Beading Wire
Beadaholique: YouTube Playlist of Beading Tutorials
Making-Beaded-Jewelry.com
Striking Quotes, “Dear Daily Mail” Song, Ballet Dancers in Action, and DIY Doily Lamp
31 Quotes That Will Give You Chills
“Dear Daily Mail” by Amanda Palmer (Live Performance)
Watch musician Amanda Palmer’s hilarious musical response to the negative review she received from the Daily Mail (critiquing her wardrobe malfunction instead of her music). (NSFW language, but very very funny)
Ballet Dancers in Action
It’s not all fluffy tutus and jumps in ballet; there are some powerful feats of athleticism hiding in these dances!
DIY Doily Lamp
Making a lamp out of a doily and a lamp kit? WHY NOT? 😀
What Gaming is REALLY All About (Pie Chart)
Whether we’re console gamers, PC gamers, or tabletop gamers, I think this little chart applies quite well… 😛

Eternal Wealth, Honor and Life
Proverbs 22:4
4 Humility and the fear of the Lord bring wealth and honor and life.
At first, this verse can seem contrary to all the traditional human wisdom we know. How can being humble and fearing anyone bring wealth or honor, and least of all life? But the humility and fear described in these verses is the humility of wisdom, and reverence for God.
For instance, when we are wise enough to understand that pride and arrogance will only ruin us in the long term, humility follows as we trust God with the things we know we cannot control. Also, when we have become humble, we are more ready to give God the honor and reverence He deserves, rather than relegating Him to a back-burner position in our lives as we stride on self-sufficiently following our own plans.
But what do humility and reverence have to do with wealth, honor, and life? Well, they have nothing to do with the worldly versions of these things, but rather the eternal/spiritual versions. It isn’t about getting rich, but getting saved; not about worldly honors, but the spiritual honor of heaven; not about physical life, but about eternal life. Humility and reverence, genuinely cultivated in our hearts, bring us closer to God, which is the best wealth, honor, and life we could ever dream of.
Into the Abyss–I Mean My Purse
Like most women, I have a pretty heavy, stuffed purse (some folks have referred to it as “the bowling ball,” lol). But unlike most women (or at least most of the bloggers I’ve seen), I don’t carry a beauty department with me wherever I go.
Of course I have the necessary items–a wallet, for instance…

And I carry a few pencils and keys with me…

But that, y’all, is about as normal as my purse gets. Let me show you 😀
My Purse: A Mishmash of Tech and Survival Kit

This is quite possibly the most important thing in my purse, besides my iPhone (with which I was taking these pictures). This little camera case holds my iPod, its cord, and 3 flash drives which are backups of all the files I have on my computer. (After the hard drive disaster I faced last winter, I will NEVER go without backups again.) So in one case, I have my music for my car, plus all my files if I feel the need to work on something while out and about.

This is the other really important item I have–my little Grid-It organizer, stuffed full of survival items. (Well, maybe not REALLY survival items, but as close as I can get!) I’ve got:
- a Tide To-Go pen for spills and stains (I need this a lot, lemme tell ya)
- Advil, Aleve, Advil Migraine, and a couple of prescriptions
- Neo To Go antibiotic spray for wounds (because I hurt myself accidentally throughout the day)
- Bobby pins and safety pins (in the Altoids Smalls tin, as seen below:

And of course, any survival kit like this would not be complete without:

Yep, that’s right–I carry Band-Aids, wet wipes, and even a bit of gauze with me in my purse. My friends and I are so accident-prone (well, mostly me :P) that you never know what we’ll need!
Aside from such techie and health-related gear, I’ve also got a few slightly more mundane items in my purse:

A paper notepad and my faithful earbuds…

My “not-a-pocket-knife” thing (has nail clippers instead of a blade, lolol) and my iPhone cord for connecting it to my computer…

My one concession to vanity–a foldup brush/mirror combo and a D-ring chock full of hair elastics. (Because sometimes, long hair becomes a bothersome mess. LOL)

I spotted this trick on one of those life-hack image things, and after I bought a 3-pack of D-rings for keys at my local Dollar General, I quickly put it into play. VERY handy, not only for elastics, but for all the little things that get lost in a purse so easily!
Summary
Now that you’ve glanced into the abyss I call my purse, what do you think? Am I crazy to carry all that stuff with me, or is this just a function of how mobile our lives are today? 🙂
Stable Sidebars: My New Favorite Layout of Choice
I know I’m probably about 3 years behind webdesign’s cutting edge (LOL), but I recently discovered how much I love the idea of a fixed, stable sidebar for my websites.
Wonder what I mean by “stable sidebar?” Here’s a couple of screenshots from my British TV shows fansite:

This is how it appears when you first load one of the show pages…

…and when you scroll down the page, the red sidebar on the left stays perfectly in place!
Why I Think This Design is AWESOME
I love the fact that the navigation and site branding stay in plain view, so nobody has to scroll all the way back to the top to browse between pages. Use convenience, YAY!
I also like that it’s a “headerless” design, which I wrote about back in June. Headerless designs force us as webdesigners to keep things more compact and less blathery (though I still found room for a little paragraph on the sidebar, as displayed in the screenshot, lol). Not to mention that the lack of a header means I don’t feel absolutely compelled to make a huge header image–and people don’t have to keep scrolling past that huge image to see content. Double WOOT!
Lastly, I like this kind of design because the sidebar functions as a visual ribbon decorating the page, adding a different color and look to this all-important bit of the page.
One Caveat: This Sidebar’s Not Exactly at the Leftmost Edge of the Page
One thing the above screenshots don’t show you is that the red sidebar isn’t actually at the left page edge; it actually hangs out kind of in the middle of the page in a fixed-width layout instead of being part of a fluid layout like most folks do.
The big reason for this? I can’t make fluid layouts work at the moment. I’ve studied, copied and pasted, and otherwise tinkered, but I’m still missing something important (my attempts at fluid layouts usually don’t scroll right, have horribly spaced out content in wide windows, or have a stinky vertical scrollbar on the side no matter what I do). I’m completely self-taught in webdesign and not really that great at understanding highly technical code, so I’ve had to mostly blunder through on my own when trying new layout styles.
So, in order to incorporate this look which I so loved, I had to find another solution, one that captured the essence of the stable sidebar without making the whole layout fluid (and thus breaking it). The following code was my fix:
How to Make a Robin-Style Stable Sidebar
#sidebar {float: left; width: 200px; padding: 5px; height: 100%; position: fixed; top: 0px; background-color: #8e0001; color: #FFFFFF; font-size: 14px;}
This is the code for the magic little sidebar. What makes the magic happen:
height: 100%;
position: fixed;
This makes the sidebar always as tall as the browser window it’s in, and it keeps the sidebar attached to the top of the page as well, so that it doesn’t scroll with the rest of the content. This sidebar stays right beside its content thanks to the old “wrapper-div” trick (seen below), which corrals both divs into a fixed-width layout.
#wrap {width: 1000px; margin: 0px auto;}
I’ve tested this in IE, Firefox, and Chrome with identical results; I don’t know how any other browser handles it, but it seems to be pretty obedient code. (IE usually has fits if I try anything creative, but this time it behaved itself!)
Comments or Questions?
Leave me a note in the comments about this design–like I said, I know it’s not the cutting edge of design anymore, but I really like it and it seems to function really well for my visitors. What do you think? (Oh, and if you have tips on how to make this kind of design work in a fluid setup, be my guest!! :D)
Make Your Own Comics with ToonDoo!
If you’re like me, you’re a bit of a frustrated artist–you have great ideas for art and cartoons, but everything you try to draw looks like a kindergartner did it while hyped up on sugar.
For frustrated or accomplished artists and cartoonists alike, there’s ToonDoo, able to help even the most inept of us make cartoons like the following:

How to Use ToonDoo
You need to sign up for an account before you can use ToonDoo–sign up for a Personal Public account (they have large Private accounts for schools to use as well). Once you do that, you can click “CREATE” at the top right of the page, and it will take you to the ToonDoo Creator. Choose the comic strip layout you’d like, and you can begin! (I chose the traditional three-panel strip, but they have dozens to choose from!)

(Click for full-size pic in new window)
Lots of windows and toolbars await you! The ToonDoo button at top left allows you to open and save comics; the rest of the buttons on the top bar give you shapes, scenes, figures, props, text and more to work with.

At the bottom, you have lots of adjusting tools to make objects smaller or larger, rotate and flip them, make them different colors–even give characters different emotions!


Hover over each of the buttons on the top toolbar to see all your options, then click on the one you want.

Add a background–you can choose Indoor, Outdoor, even Fantasy spaces!
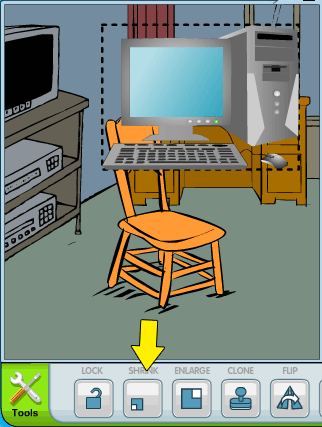
When you add props, you can shrink or enlarge them as needed–just select them with your mouse and then click the “Shrink” or “Enlarge” buttons on the bottom toolbar.

Or you can flip them horizontally if you need them in a different position. Select the prop you want to flip, then click the “Flip” button!
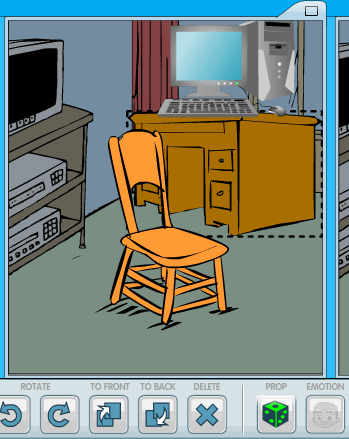
You can even turn props to be at a different angle–check out how the desk is turned from the previous picture. Select the prop you want to turn, and then click the Prop button (looks like a six-sided die) several times to see all the different ways the object can be presented.

You can also add text and characters in the same way, using the top toolbar to select what types you want, and using the bottom toolbar to fine-tune the positioning and presentation. (Sorry I didn’t get a screenshot of the “adding characters” process–I got kinda carried away making my comic :D)
Once you’re done with your comic, make sure to click the ToonDoo button at the top left of the screen and select “Save;” this will let you put in your comic’s title and tags. Then click Publish! (Important: Wait until you get a confirmation message that “your comic has been published” before navigating away from the creator page.)
Give this a shot if you’ve got a spare 15 minutes–see what you can come up with!
Hack Your Fitness, Unusual Laws, Beautiful Places, and Anagram Generator
Hack Your Fitness
Great tips for getting better fitness results!
Unusual Laws Around the World
Driving with flip-flops is illegal in Spain, chewing gum is illegal in Singapore, stepping on national currency is illegal in Thailand….
30 Places You’d Rather Be Sitting Right Now
Beautiful pictures of places all over the world!
Anagram Generator
Give your inner word nerd a happy moment with this little online tool.
Tongue-in-Cheek HeroClix Powers
For this week’s post, I was inspired by Magic: the Gathering’s joke card sets (Unglued and
Unhinged); I wondered what it’d be like if HeroClix had a whole slew of joke powers and figures. Here are a few I came up with:
Funny Movement Powers
Place Legos
A character possessing this power can place up to 4 Special tokens while moving. Opposing characters who cross one of these spaces have to stop; they are dealt 1 unavoidable damage and given 1 extra action token immediately. (Because stepping on a Lego automatically means hopping around in crippling pain!)
Vine Swing
This character can move between any two squares of Hindering Terrain, provided that the line of movement does not cross more than one square of Water or Clear terrain (and crosses no Blocking terrain). (Should the Tarzan yell be a requirement for using this power?)
Funny Attack Powers
Whine
(Prerequisite: “Kid” keyword)
When this character is adjacent to an opposing character, roll 1 d6 at the beginning of your turn for each opposing character this one is adjacent to. If the result is 5 or 6, place an action token on the opposing character. (Because you can only put up with whining for so long…)
Duct Tape
When this character attacks an opposing character, place a Duct Tape token on the opposing character’s card. Until your next turn, that character may not attack or move adjacent to any opposing or friendly character. When your next turn comes, remove the Duct Tape token, and that character takes 1 unavoidable damage. (Duct tape: the fastest way to stop somebody from talking. XD Also, ripping the duct tape off is extra revenge… LOL)
Funny Defense Powers
Oh No She Didn’t
When attacked, this character may immediately make a counter-attack as a free action, with +1 to their normal attack value. (Add a Z-snap if you wish :D)
On the Throne
This character cannot be the target of an attack if he or she is on a square of Hindering Terrain representing a toilet. (“I’ll be out in a minute!!!”)
Funny Damage Powers
Pen Poke
When this character is adjacent to an opposing character, deal damage to the opposing character at the beginning of your turn, rising incrementally every turn that the two are adjacent. (Example: 1 damage first turn, 2 damage second turn, etc.) Defense modifiers come into play as normal. (Because poking someone with a pen usually just gets more and more violent until you get their attention…)
Sriracha Attack
(Prerequisite: “Bottle of Sriracha” Item)
A character possessing this power and holding the “Bottle of Sriracha” may attack as normal. When opposing characters are damaged by this character, they take normal damage, then take 1 unavoidable damage on each of the next two turns. Opposing characters holding the item “Glass of Milk” are not affected by the unavoidable damage. (Those of us with no spicy food tolerance know how accurate this power is!)