Tag Archives: strategy

The Art of the Expensive Combo

expensivecombo
In Magic: the Gathering, I gravitate toward late-game awesomeness. Forget quick and easy combos–I want something that takes several turns to set up, so that I can savor the win when it becomes unstoppable. The idea of building an invincible combo one unassuming card at a time is so much fun.

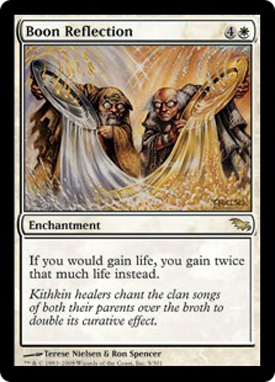
This tendency certainly hasn’t dimmed or vanished in recent years. One of the recent decks I’ve been working on is basically a combo deck involving Sanguine Bond and Boon Reflection.

 
The epic–and expensive at 10 mana–combo

I LOVE This Idea…

These two card effects blend beautifully, making my opponents lose double life every time I gain life. I’ve actually been able to use two Whitesun’s Passages to defeat somebody in one turn with that combo on the table.


With Boon Reflection on the table, you gain 10 life instead of 5. Two of these played while Sanguine Bond’s out, and you’ve just made your opponent lose 20 life… 😀

…But It Took a Lot of Work to Get Here

However, just because a combo works beautifully in your head doesn’t mean that it will ever come to fruition. I worked on my Sanguine Boon deck (as I’ve come to call this particular combo deck) for almost a year before it really got off the ground, because I couldn’t draw enough mana to play all the combo pieces when I needed to play them. Either that, or I couldn’t even draw the combo pieces at the right time. Since it’s a deck that involves enemy colors working together, I knew it would be difficult, but I didn’t expect it to be impossible.

So, I ended up chatting with one of my friends about this conundrum I was having, forgetting momentarily that he was quite knowledgeable about many of the cards and strategies available to Black. I was (admittedly) venting about my frustration with the deck, and after a few thoughtful moments, he said, “Hey, you ever tried Dark Ritual or Demonic Tutor in that deck?”

 
These cards solve two problems: having enough mana and getting the card you need at the right time.

I hadn’t. Truth be told, I kinda knew the cards existed, but I hadn’t really paid attention. Black has never really been “my color” in M:TG, so I didn’t know the color inside and out like I know White and Green. His question made me ask myself: why am I not using Black’s support cards to get my combo, anyway?

Making This Expensive Combo Run Right at Last!

I realized then that I had been relying completely on the luck of the draw with this deck. I had built the deck with only Sanguine Bond as the main Black card, and had not used Black’s wealth of searching cards (also called “tutor cards”) to get the cards I needed into my hand. When you have an expensive combo like Sanguine Bond and Boon Reflection, you need both the actual cards to play AND the available mana to play it, fast!

The addition of Demonic Tutor and Dark Ritual has helped Sanguine Boon become a truly winning deck in the games since then. The Black components (deck-searching and mana generation) helps all the White components be able to gain their life and defend life points long enough to get the combo in play. Once Sanguine Bond and Boon Reflection are both in play, White takes over and begins to kick butt by gaining life (a LOVELY strategy if I’ve ever heard of one!).

Moral of the Story

Don’t put aside the idea of a combo just because it takes too much mana to pull off. There are plenty of cards in M:TG to support even the most expensive of combos, if you’re willing to look outside your comfort zone!

Stress Test: Being the Healer

stresstestbeingthehealer
Players of MMOs, like World of Warcraft and City of Heroes, know the value of a “healer”–the character who heals damage in a team, so that the team’s big bruisers and snipers stay alive long enough to do their job. Healers are always in demand, whether a group is advertising for a priest or for an Empath; they know they will need someone backing them up with supportive, team-oriented powers.

But not everyone is cut out to play a Healer. If you like to deal lots of damage and kick a bunch of butt, the Healer class is not for you. If you don’t like playing with other people, and prefer to go your own way, the Healer class is also not for you. Creating and playing a Healer is about being defensive and supportive, being team-oriented, and most of all, maintaining that team as long as you can. It can be a lot of hard work, but I like to think of it as a “stress test.” If you can handle being a Healer, you can handle just about anything the game throws at you.

Throughout this article, I’ve used actual screenshots from a session of playing Lyssadia, my Empathy/Energy Blast Defender. Empath Defenders are one of the most common builds for Healers in City of Heroes, and Energy Blast typically knocks enemies back so that they are stunned for a few seconds, so her attacks still work to support the team.

Healers have to care. A LOT.

No longer can you just run ahead of your team, heedless of everything the other players are doing, and shoot or slash the living daylights out of everything. If you’re a healer, you need to care about what your team is doing, because without you to back them up, they can easily get wiped out in the middle of a big enemy spawn.

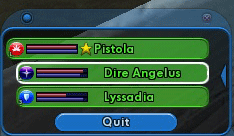
You also need to care about the welfare of each of your teammates mid-battle. Your particular MMORPG, like City of Heroes, may allow you to have a sort of “Team Window” where you can monitor each member’s health and other vital stats.


This little window is a godsend for healers. Out to the side, you can see all the little icons representing many of the buffs each character has on them–this helps me figure out who needs which buff, who needs healing, etc. I just look for the bright green icons to know whether I’ve buffed somebody recently, and I can easily watch their red Health and blue Endurance bars, too.

Believe me, as a person who’s played just about every Archetype available in City of Heroes/Villains, damage-dealing characters do depend on their healer teammates to be the “net,” to catch them if they fall! Caring healer players can literally be the saviors of their teams during huge battles.

Healers have to be responsible.

Caring also entails responsibility. You have to be paying attention to where the team is going, not wandering off randomly by yourself because you accidentally closed your Map (*raises hand* Guilty). You also need to scan the battlefield at all times, not just focus on the particular enemy or ally in front of you. This helps you stay alert to rapidly-changing battle events.

For example, here’s what happens when you focus too long on one particular thing as a Healer:

I’ve selected one of my teammates’ names in the Team Window at left, denoted by the white box around the name, and have just healed him close to full health. My own health bar isn’t looking so great, though, because in healing my teammate, I’ve come a little too close to the battle front.
See all those red numbers above Lyssadia’s golden halo? That means somebody’s damaging her. The red and blue bars just above the halo show her health and endurance–her blue endurance bar is nearly full, but her red health bar is almost half gone. I have to get her out of the line of fire fast!

Healers have to be careful not to make themselves targets; that’s one reason I say to keep moving and keep watching your screen. Otherwise, you can end up with one very dead Healer…


(This is what happens when I’ve gotten a little overzealous shooting stuff and forgotten to heal myself. Poor Lyssadia. Learn from my fail.)

Healers have to FOLLOW the team, not lead.

Healers actually work best at bringing up the rear–many healers have secondary attacks that they can fire off to prevent a few straggling baddies from stabbing the group in the back, and you can also monitor your teammates more carefully if you are behind them rather than in front of them. As the healer, don’t be the first to fling an attack or explore ahead of your group, because this is a good way to get your Empath character killed.


(Through the confusion of colors, you can see the two names in green in this screenshot–those are my two teammates up ahead of me. Since I’m behind them, I can visually monitor what is going on, and I can click-and-heal them if I need to.)

Several of my healers can fly, so usually I will hover above the fracas, healing, buffing, and offering a bit of cover fire when needed. This elevated position helps a Healer see more of the battlefield, and it can keep you in range of allies who would otherwise be out of range of targeted heals and buffs. Whether you choose to fight from the air or ground, however, it’s important to stay in a central position in the team–if you’re too far forward or too far back, you might not be close enough to a teammate to help them.

Here’s Lyssadia in flight, going “pewpewpew” at the Auto Turret in her sights. My teammates were still in sight in the larger version of this screenshot, so I could take a few shots, then heal or buff if necessary.

Healers have to heal/buff first and fight second.

Even though most healers on City of Heroes are ranged attackers as well, they really work best if you focus on buffing everyone and healing everyone first, and only attacking if absolutely necessary. It can be very tempting to start fighting along with your teammates if you start taking damage yourself, but stay the course–if you can keep your teammates alive by a few well-timed heals and buffs thrown their way, then you won’t have to worry very much about taking damage!


(In this shot, I’ve targeted onto one of my teammates, marked by the green box around his character, and am sending an application of Fortitude his way, which will increase his Damage Resistance to just about every type of damage for 1 minute.)

Healers have to focus.

Eating, watching TV, or doing anything else while trying to play a healer will not work. Even if you can type quickly, sometimes even chatting with your teammates takes too much attention away from the job at hand. Since much of the team depends on you to keep them in fighting shape, you have to maintain a focus that you don’t necessarily have to have when you’re playing a damage-dealing character.

It can be a bit stressful, especially if you’re trying to keep up with a team whose members don’t talk about what they’re going to do before they do it. But if you’ve got a good team going, with lots of communication, it’s relatively easy to stay focused.


(I’m staying a bit further back from the fray in this shot, because there are still several high-level enemies alive, but my teammates are generally mopping ’em up okay. I just need to be alert in case a teammate gets caught unawares by an enemy shot. This time, I’m not making Lyssadia fly into the fight just to get shot!)

Summary

Playing a healer does require a bit more work, but it is a very rewarding type of character to play if you enjoy being needed. It’s a team-oriented mindset that can make battle less boring and more involved…for certain, it is a VERY different kind of challenge. If you’ve never played a Healer before, give it a shot!

Resident Evil Deck Building Game

residentevildbg
For those who are not familiar with any of the Resident Evil video game series, the whole concept sounds like something you don’t want to mess with. Arming yourself with various and sundry weapons to fight zombies? Sounds like a horror movie gone crazy.

I certainly thought this way about the video games, and wasn’t too enthused about playing a deck building game based on the same mythos. Horror and killing stuff really isn’t my bag in movies or video games either one, so when my boyfriend (a major Resident Evil fan) asked if I would like to try the deck-building game, I expected it to be not much fun.

Boy, was I proved wrong! In the Resident Evil DBG, like many other deck building games such as Ascension and Dominion, the long-term strategy is the winning strategy, which means lots of fun happy times for gamers like me who like to play for the long-term gain rather than the short-term strike.

To Begin The Game

All players in the Resident Evil DBG start out with a character card of your choice (more about those later) and the same 10 cards in their decks:

7 ammunition/gold cards, worth 10 ammo and 10 gold each, used for powering your weapons and purchasing upgraded items and ammo
2 combat knives, each of which can deal 5 damage and doesn’t require any ammo
1 handgun, which requires 20 ammo to work and which can deal 10 damage

From this original 10-card deck, you draw 5 cards and begin your turn. On your turn, you may buy 1 resource from the rows of resources laid out on the table, play 1 action, and explore the Mansion 1 time if you choose. Once your turn is over, you take all the cards you’ve played this turn and place them in the graveyard (your used cards), and draw 5 new cards to prepare for your next turn.

Wait, What’s the Mansion?

The Mansion is familiar to those who have played the Resident Evil video games, but in the context of the game, it’s simply another deck of cards on the table. When you want to “explore the Mansion”, you must have a weapon (like the Combat Knife, the Handgun, or other sundry upgrades to these items) in your hand, as well as enough ammo to power it. You then declare you’re going to explore, and then turn over the top card of the Mansion deck. Whatever Infected zombie creature is revealed, your weapons must deal it enough damage to defeat it in one hit, otherwise the Infected creature deals your character damage and then goes back under the deck.

Say, if you explored the mansion with two Combat Knives and a Handgun. You’re able to do 20 damage, because each Combat Knife does 5 damage, and the Handgun does 10. All the weapons you play combine together for total damage, unless otherwise specified on the card or the character.


If a Male Zombie shows up as the top card, you’re in luck, because it has 20 health and will be defeated with your combined 20 damage. You then get 1 decoration for having defeated it.


However, if the top card is a Licker instead, you’re out of luck–it has 40 health, and will not be defeated by two Combat Knives and a Handgun combined. You will instead take 30 damage from the undefeated Licker, which will then go under the Mansion deck to be rediscovered later. (Be careful–you can end up taking enough damage from undefeated monsters to actually kill your character!)

Different enemies have varying levels of decorations–some give you 2, 3, or 4 decorations if you defeat them, and the two strongest monsters in the Mansion (Nemesis T-Type and Uroboros Aheri) give you 5 and 8 decorations, respectively. Whenever Uroboros Aheri is successfully defeated, the game ends, and everybody counts up decorations–the highest total wins.

Character Cards

Fans of Resident Evil games will recognize the various characters included in each box of Resident Evil:DBG. Familiar faces like Jill Valentine and Chris Redfield are there, alongside others like Jack Krauser, Sheva Alomar, and Ada Wong (my personal favorite).

Some characters have weapon specialties–you’ll want to give Jill all the Grenades she can carry, for instance, while Sheva makes magic with Rifles and Krauser is a beast with Knives.

Each character in the original DBG has two abilities that activate when they have gained a certain number of decorations. At Level 1, the character can use the first ability listed on their card; at Level 2, they can use both abilities.

The reason Ada Wong (at left) is my favorite is because of her Level 1 ability, which allows her to “peek” at the top card to see if it’s something she can defeat with her current damage total. Ada can put the “peeked” card on the bottom of the Mansion instead of trying to defeat it, and she can then go for the second-from-the-top card instead. (This is great for moving Uroboros Aheri out of the way when I don’t have 90 damage to defeat his 90 health, because with my luck, I’m ALWAYS drawing the boss. XD)

Another important point to remember: each character also has a set amount of health. Some characters can survive a 70-point hit by Uroboros and live to tell about it next turn. Unfortunately, Ada and several other characters only have 70 health to begin with, so they have to be played more carefully. No haphazard reckless exploring the mansion for them!

Look through each of the character cards and see which ones fit your playstyle. Since I’m horribly unlucky in my Mansion draws, Ada’s ability suits me well. But you may find that another character is your favorite!

Game Modes and Resources

You can play Resident Evil: DBG several ways–a list of possible scenarios follows.

  • “First-Timer:” helps you get used to the game mechanics, basic and fun
  • “Mercenaries:” timed game, with various mini-scenarios to act out
  • “Versus:” where instead of fighting the zombies, you try to defeat the other players!
  • “Custom:” you and your fellow players choose resources to purchase, and play much like First-Timer

There are many, many different resources you can use to build your perfect streamlined deck in the game, such as upgraded weapons, healing herbs, and cards that let you get weapons back, trade out items, draw more cards, etc. Each game mode has its own set variety of resource cards–in First-Timer, for instance, there are some cards in the box that aren’t even allowed on the table, whereas in Versus mode, you’d make copious use of those cards.

My Personal Strategies

After several times of playing the game, I generally know what some of my first purchases are going to be. Purchasing upgraded ammunition cards is the first order of business–trading out all those 10s for 20s and eventually 30s will help power bigger weapons and will help you pay for those bigger weapons, too. Also, purchasing cards that help you clean out the cards you no longer need is very important. (Once you’ve purchased bigger and better weapons, you’ll want to get rid of the Handguns and Knives unless your chosen character has a specialty with them, for instance.)


The Six Shooter is kind of an upgrade from the Handgun, is it not?

Action cards such as Shattered Memories, Ominous Battle, and Item Management (no image) are great support cards for early- to mid-game deck thinning and streamlining. Other helpful Actions include Reload (get a weapon back from your graveyard, get 2 actions), Umbrella Corporation (draw 2 cards, put 1 card from your hand back on top of your deck, get one more Action to play), and Escape from the Dead City (draw 1 card, get 2 actions).

I generally don’t explore the Mansion for about half of the game–most of the first half of the game is getting my deck streamlined, and I usually avoid getting damaged by too-strong monsters until I’m ready to take them on.

However, by not exploring the Mansion, I sometimes miss out on the two most epic weapons in the game, which are actually hidden in the Mansion. Sometimes, you’ll Explore and come across one of these babies as the top card:

 
The Gatling Gun can be filled with any amount of ammo for equal amount of damage; the Rocket Launcher deals a flat 90 damage for 0 ammo investment.

For me, I’m not willing to risk Ada on the possibility of getting one of these weapons, so I play carefully. If the other players get the Gatling Gun or the Rocket Launcher, that’s great for them–I am simply more comfortable using tried-and-true (and safe) methods to last through the game. I don’t know if this playstyle would work for everyone, but it’s won me most of the games I’ve played so far!

To Find Out More

Unfortunately, the official game website has been closed because Bandai is no longer publishing RE:DBG as of 2013. But you can still find information through the RE:DBG page on the Resident Evil Wikia. Also, BoardGameGeek’s page on this game is a great resource as well, and I used it heavily while writing this article.

You Hurt Me, I Hurt You: The Mystics Team Ability

youhurtmeihurtyou
In HeroClix, most gamers typically gravitate towards high-damage, high-attack pieces, especially the ones that can move and attack in the same turn. Pieces with 11 or 12 attack, 3 or 4 damage, and either Charge, Running Shot, or Hypersonic Speed are the “Most Wanted Clix.”

I am not one of these gamers–in fact, the pieces I choose for my collection could be labeled “second-stringers” at best. If I have a 10 attack showing among my teams, it’s an unusual team for me. Most of my teams are made up of support pieces and a few solid but not overpowered pieces. It’s only when people begin to play against me that they realize those smaller pieces are actually serving another purpose besides attack: they are all Mystics. And they are FAR stronger than my opponents recognize, until it’s too late.

What Is The Mystics Team Ability?

The Mystics team ability (not to be confused with the “Mystical” keyword!) is indicated by any of the following team symbols on a HeroClix figure’s base:


From left:  Mystics, CrossGen, Arachnos

Any of these three symbols, printed on the back of a character’s dial, mean that if an opponent attacks and successfully damages this figure, the attacking figure takes 1 unavoidable damage. It’s a “You hurt me, I hurt you” strategy–very reactive in playstyle, since it depends on the other person making a successful attack.

Mystics In Practice

This might seem counterproductive at first. Why would someone want their own figures to be damaged? Doesn’t that mean you’ll be beaten faster?

Not necessarily! 😀

Run Lots of Support with Mystics

Here’s the primary beauty of the strategy: more often, the people I play against are not running pieces that have Support (the ability to heal a friendly character). I, however, am running one or two pieces with Support (also known as “Medics”). If one of my Mystics pieces takes a wee bit too much damage and is in danger of being KOed, I simply get him or her back to a Medic while some of my other Mystics pieces take over. In a few turns, my hurt Mystic is back on top click, and the opponent’s pieces have likely taken more damage in the meantime, either from a Mystic hit or from actually being attacked.

Run Wildcards with Mystics, Too!

One way I love to run Mystics pieces is to run them with a bunch of Wildcards–a list of Wildcard team symbols follow:


From left:  Spiderman-Ally, B.P.R.D., Minions of Doom, Legion of Superheroes, Calculator, Freedom Phalanx

The reason? Wildcards can copy the Mystics team ability. Suddenly, Young Superman is a Mystic–you deal him damage, you take a damage! Spider-Girl is a Mystic, too–you deal her damage, you take a damage! And so on.

So, if my whole team is full of Mystics such as these, and you don’t have a Support piece, you are in trouble. True, your pieces might deal more damage to mine at first, but I likely have more Wildcard Mystics ready to fill in for the one who’s running back to the Medic. Not only that, but the Wildcard pieces help round out the team with some higher damage and attack, as well as some strong abilities of their own, like Charge, Incapacitate, or my favorite, Super Senses. (I roll a 5 or 6–your attack misses my character. I roll a 1 through 4–my character takes damage, which means yours takes a damage, too. It’s a win-win!)

Important Pieces of Strategy

This team ability works best if you have a lot of small point-value characters rather than a few large point-value characters. Having a Mystic over a hundred points is great, but you’re not going to have a lot of room for support, other Mystics, or Wildcards. My favorite strategy is to actually choose two of the cheaper Mystics (Zatanna Zatara, Jason Blood, Nightshade, etc.) and build my team full of Wildcards and Support from there. That way, I have the Mystics team covered, but I also have room for attacking pieces that will likely take some damage along the way.

Try the Mystics team ability sometime if you’re looking for a different way to win. Sometimes, an opponent’s successful attack can work against them!

Game Tactics: Are You Proactive or Reactive?

gametactics
In most collectible games, like Magic: the Gathering and HeroClix, there are typical tactics and strategies to follow. Lots of players will look for “killer combos”–cards or miniatures you play together to win more or more quickly. (In the case of Magic: the Gathering, people often put their most tournament-capable decklists up online for others to copy and play.)

Sometimes, these combos will suit your playstyle perfectly. Other times, it will seem completely alien to play these cards or these miniatures together. It all depends on what kind of player you are–proactive or reactive.

Proactive Player

  • Shows himself/herself as a threat early on
  • Strategy is quick to set up, quick to knock down
  • Best defense is a good offense
  • Shines in one-on-one games
  • Overwhelmed in multiplayer games
  • Reflexive and aggressive

Reactive Player

  • Looks harmless until other player strikes first
  • Strategy takes a while to set up but is resilient
  • Best offense is a good defense
  • Shines in multiplayer games
  • Can’t stabilize soon enough in one-on-one games
  • Slow, strategic, defensive

My Personal Type

Personally, I’m much more reactive than proactive. I tend to play like a spider–camp out, weave my web, and wait for the opponent to step into my trap, while building up so much redundancy that by the time anybody realizes what a threat I am, it’s far too late for them to do anything about it. But I don’t generally attack first–I wait to be provoked into action. In multiplayer games, where I have the most fun by far, I often find myself allowing the other players to thrash each other before stepping out from behind the curtain and mopping up.

Do We Game Like We Live?

This self-knowledge led me to ponder something, though: as gamers, are our favorite strategies reflective of how we live our lives? I found out that I’m pretty reactive in real life too–I’m your ally unless you cross me, and then I am your enemy until you explain yourself. Otherwise, I try not to make enemies of people because I hate the feeling of another person being angry at me. I don’t necessarily have to have the last word, as my “mop-up” strategy implies, but I do prefer to stay out of a fight unless personally attacked. Once I’m attacked, all bets are off!

If you’re a gamer of any sort, think about this the next time you sit down to a game, and see how your tactics fit into one of these two basic types. You might just find a little self-knowledge hidden among the bits of your favorite hobbies, like I did!

Onslaught 2 (Tower Defense)

onslaught
With several different maps, multiple difficulty levels, and dozens of towers to choose from, Onslaught 2 is one of the most detailed and customizable tower defense games I’ve ever played. Read on, and see why I enjoy it so much!

Basic Gameplay

In Onslaught 2, you are trying to guard the military base (marked “Area 51”) from being invaded by waves of enemies. To that end, you have to build towers of varying types to defend the winding route to the base. If 10 enemies get past you and invade the base, game over. With every enemy you shoot down, you get a certain amount of money, which increases by 1 dollar with each wave of enemies.

This money is for upgrading your towers’ damage, rate of attack, and range–but you have to upgrade strategically! For instance, if you upgrade the tower’s range all the way and forget about its damage, soon you’re going to be pinging away at enemies that barely even feel the bullets, even if you can shoot them from way far away. Thinking and planning ahead is key (see next section for my strategies).

As you progress in the game, shooting down enemies and getting money, you also get access to different types of towers you can build. For instance, you can build a taser tower (temporarily paralyzes enemies), a sniper tower (epic, one-shot damage) and even a railgun tower (zaps the enemy it’s aimed at, as well as all the enemies in a straight line behind that enemy). As the enemies get stronger, you’ll need those better towers to aid you!

My Strategies

I find that upgrading a tower’s damage is of the utmost importance, followed very closely by upgrading its rate of attack. A tower that can shoot for massive damage multiple times in a few seconds is likely not going to need a long range to defeat its enemies. But some players have done well balancing upgrades to damage and rate of attack with upgrades to range; it’s all in what your particular playstyle is.

Though I liked to use the pellet gun tower (blue) when I started playing, I have found that it’s not so helpful after the 100th wave. Likewise, the laser tower (green) isn’t really of much use late-game unless you get a whole chain of them together so they can help each other out. Thankfully, you can sell off older, fully-upgraded towers later on if you need the money to upgrade stronger towers.

As in most games, there are very powerful combos; you can put two or three towers side by side to create much more damage output. I like to use the Rocket (red tower) and the Taser (yellow tower) together–once both their damage output is fully upgraded, they unleash homing rockets that are pretty much one-hit kills for at least 5 enemies. Great for clearing out a clump of baddies!

You can find more strategies and combos by visiting About Combos on the Onslaught website, or by visiting the Onslaught 2 page at JayIsGames.com. One thing’s for sure, there are many ways to succeed in Onslaught–there’s always new things to try!

Play the game: Onslaught 2